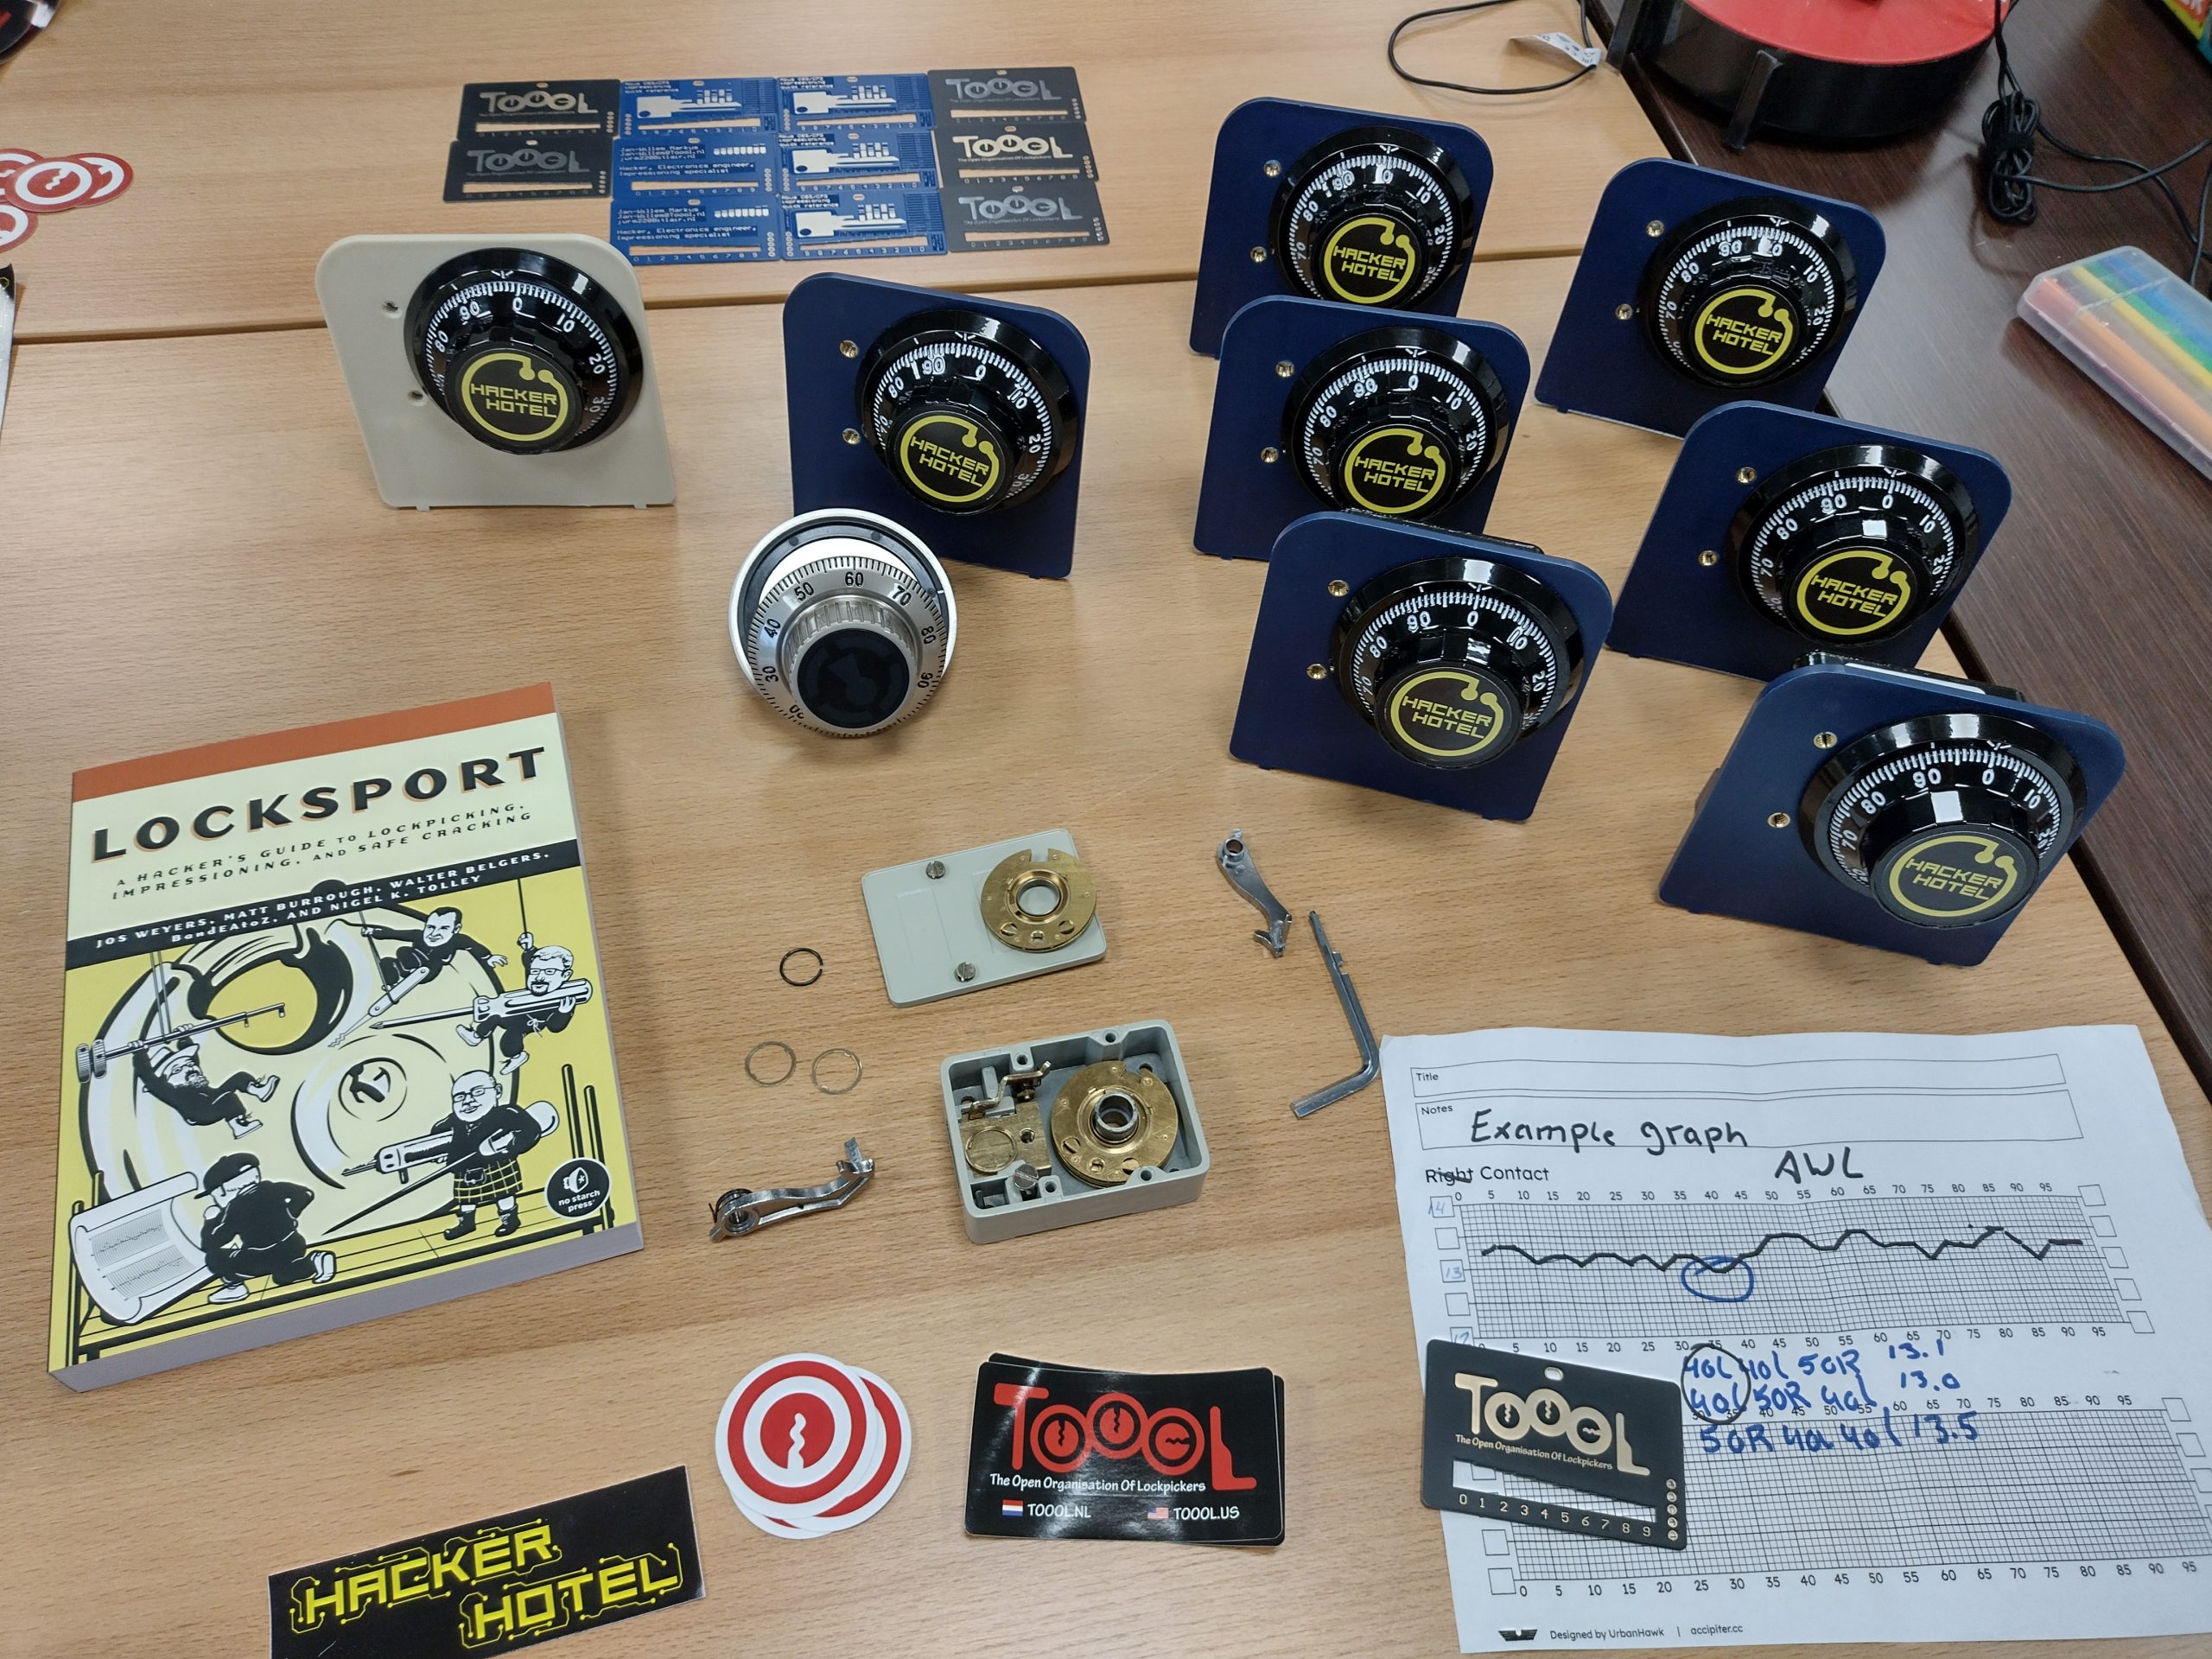
Hugo and I taught Safe cracking to a group of eleven at Hackerhotel 2024. It was great sharing the knowledge and inspiring others. Much respect goes to the attendees, which after a busy conference still had energy to take on this mighty challenge.
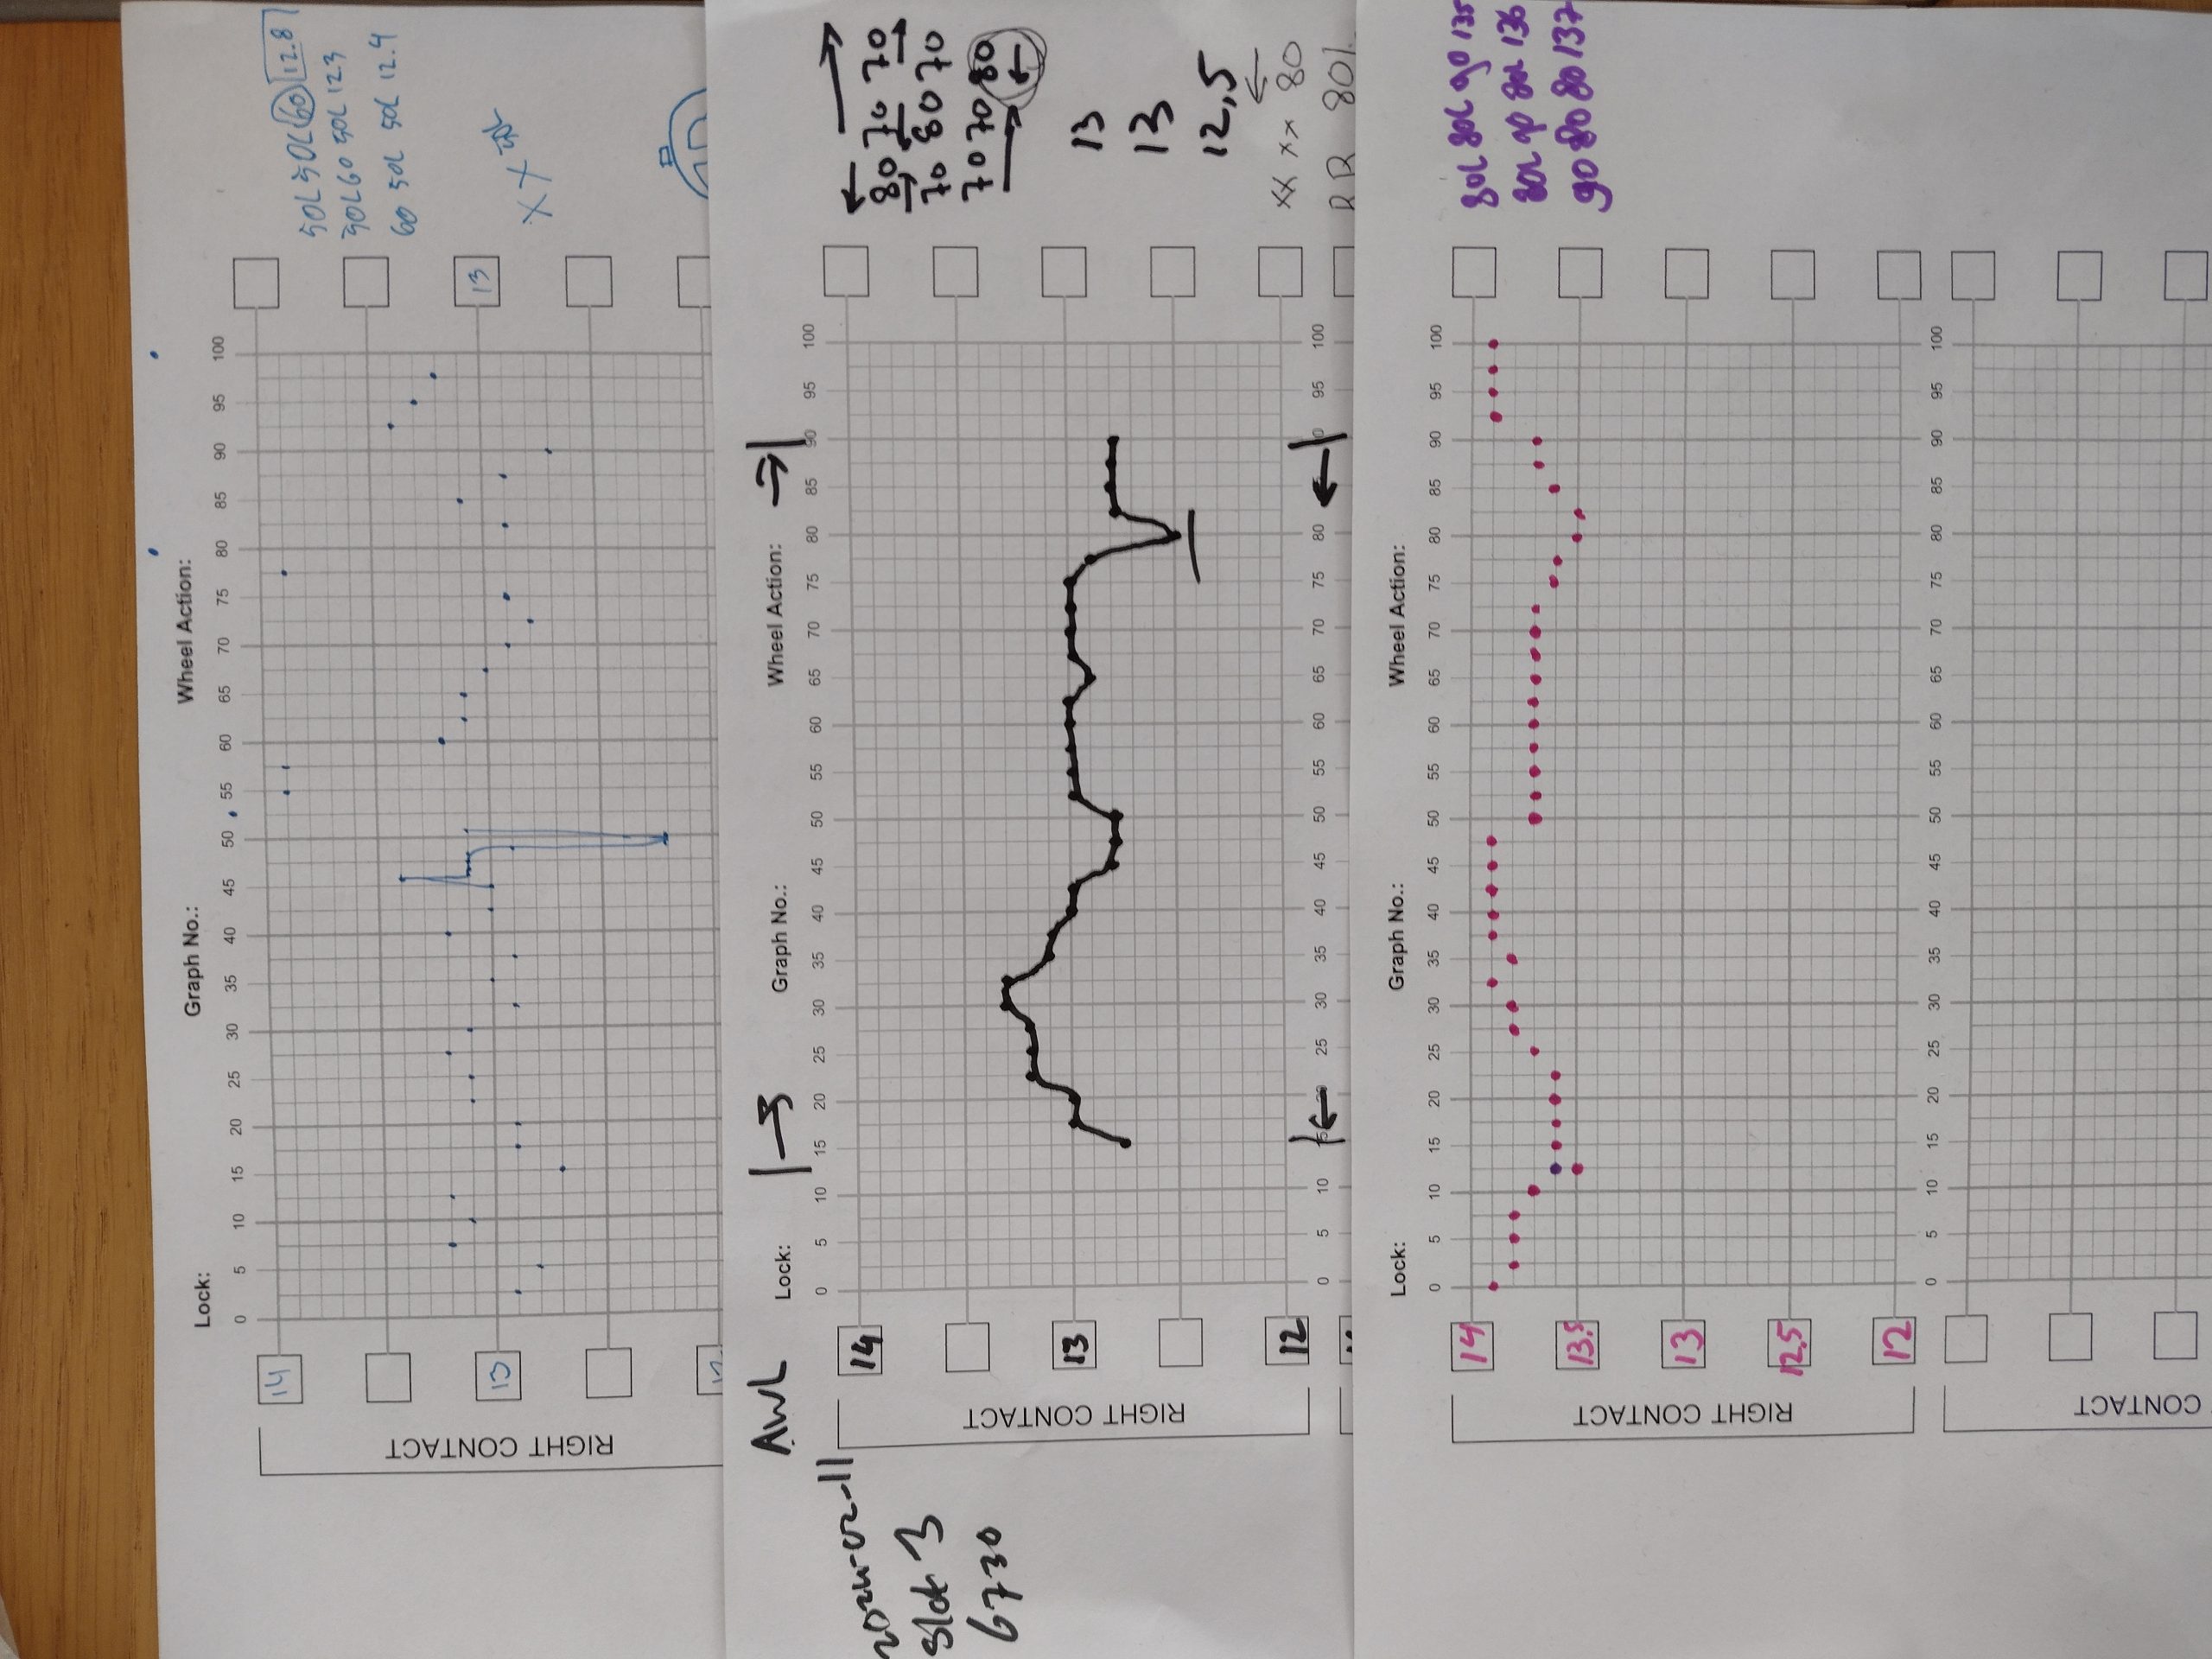
Every training needs to start with a good basis. We started with an introduction on what safe locks are about and how they operate, specifically group two safe combination locks. From there, we built knowledge from practical examples and exercises. From simply operating the safe lock by dialing 4L-3R-2L-1R with a known combination, to exploring contact points and graphing.
For this two-hour session, we worked with locks of known combination, and usually only get to complete one and a half graphs in this time. Around six graphs were completed in total, and some even finished all three graphs within the session.
While any training is mostly satisfying a curiosity, we expect this training gave the attendees enough knowledge to give it a try on their own later. Maybe even getting obsessed about it in the process 🙂
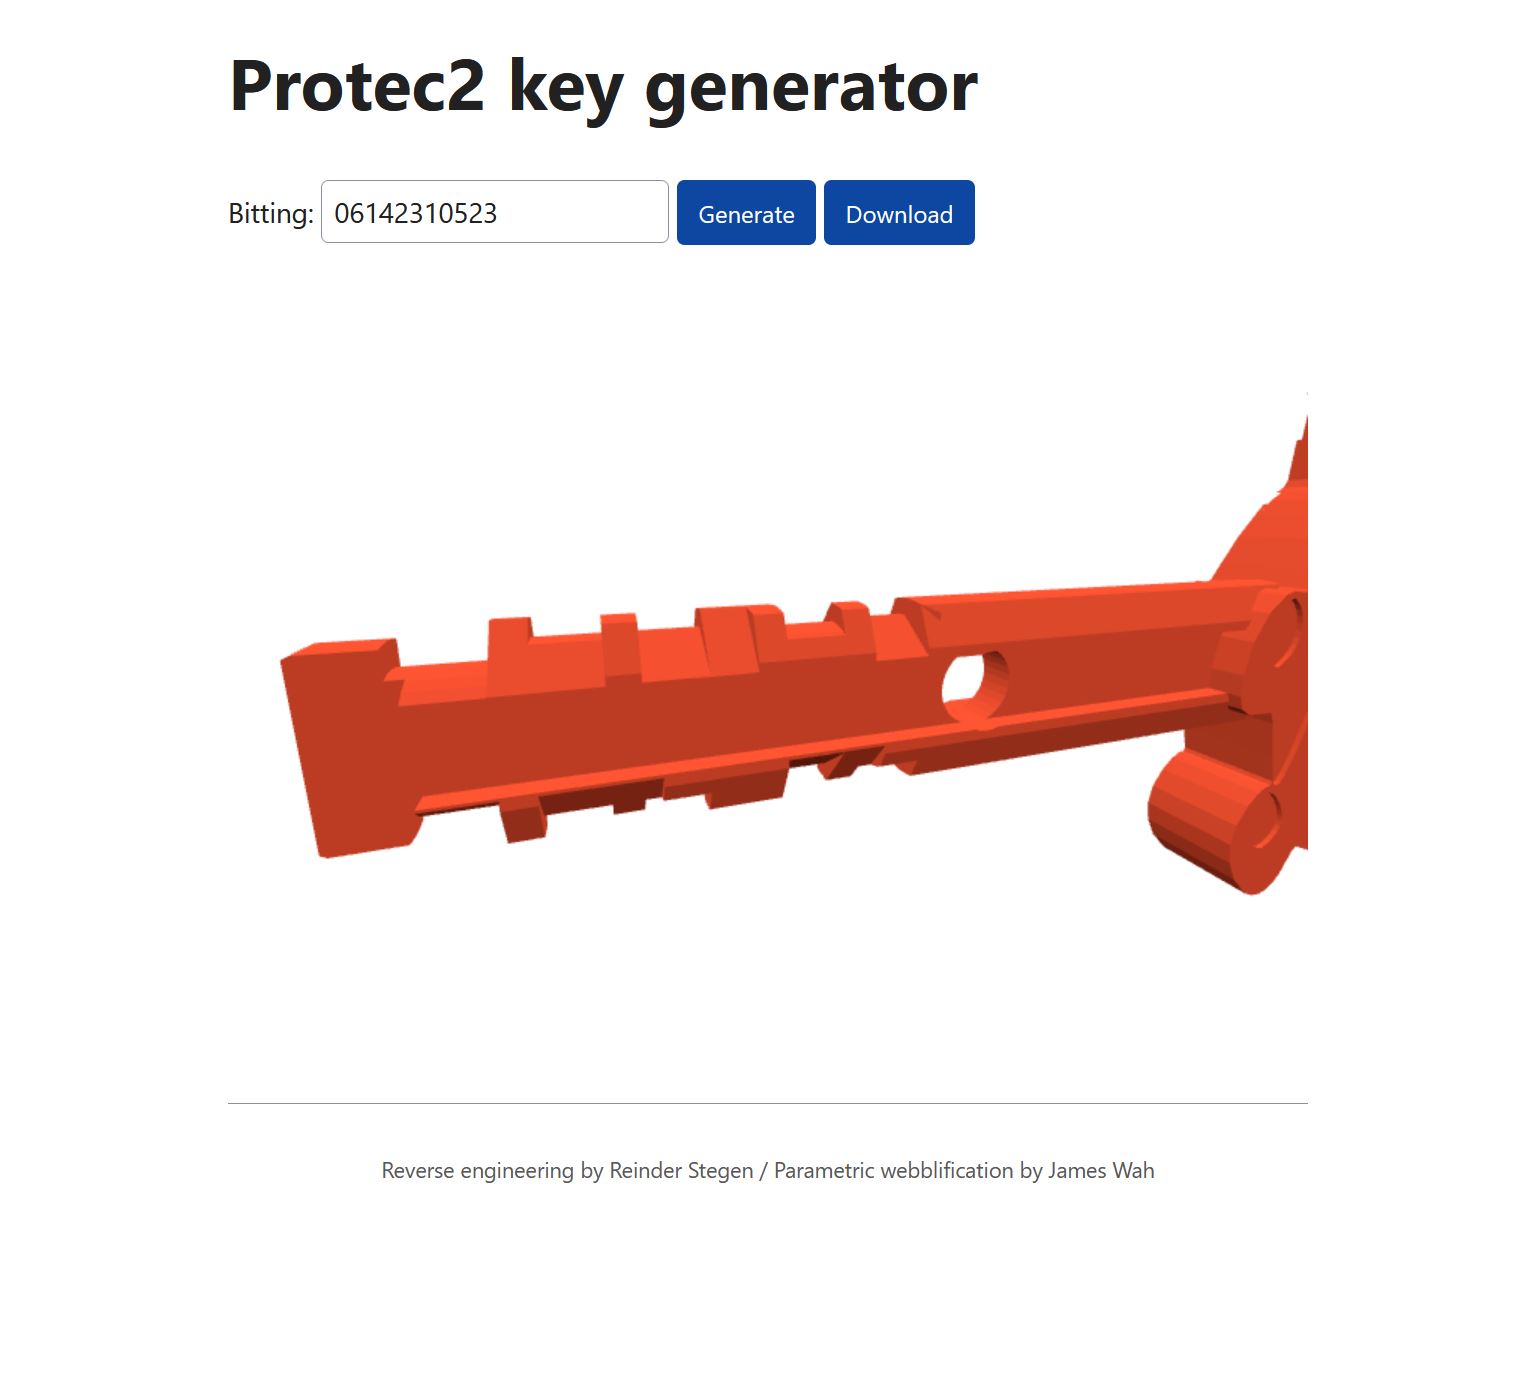
This story is based on the work from Reinder Stegen, in which the Protec2 was reverse engineered and scripts for parametric key generation are written. Reinder worked with James Wah for the parametric webblification. As in, a free to use online webgenerator for all your Protec2 key needs. To get the keys to the real world, one just needs a good 3D printer.
3D printing keys has been around for at least a decade, from 3D printing scrips like AutoKey3D by Christian Holler to printing many high security keys. Modeling and printing keys gives unique understanding of the underlying principles of the locking mechanisms. I, myself, wouldn’t have understood Kromer protector, Bowley Rorasera, and Fichet F3D as well without modeling the keys.
While 3D printing keys can be a strong attack, the bitting of the key needs to become known to an attacker beforehand. If this attack is within your threat model, please invest into key control. I.e. to keep track of the locks and keys in your system.
The challenge
A set of nine Abloy PL340 locks caught my attention as it was sold as a lockpicking challenge. As in, the seller didn’t have the correct keys, but included keys from the same series. Where the challenge is to open the locks. I chose to work with Reinder to decode one, and 3D print the keys for the rest of the set.
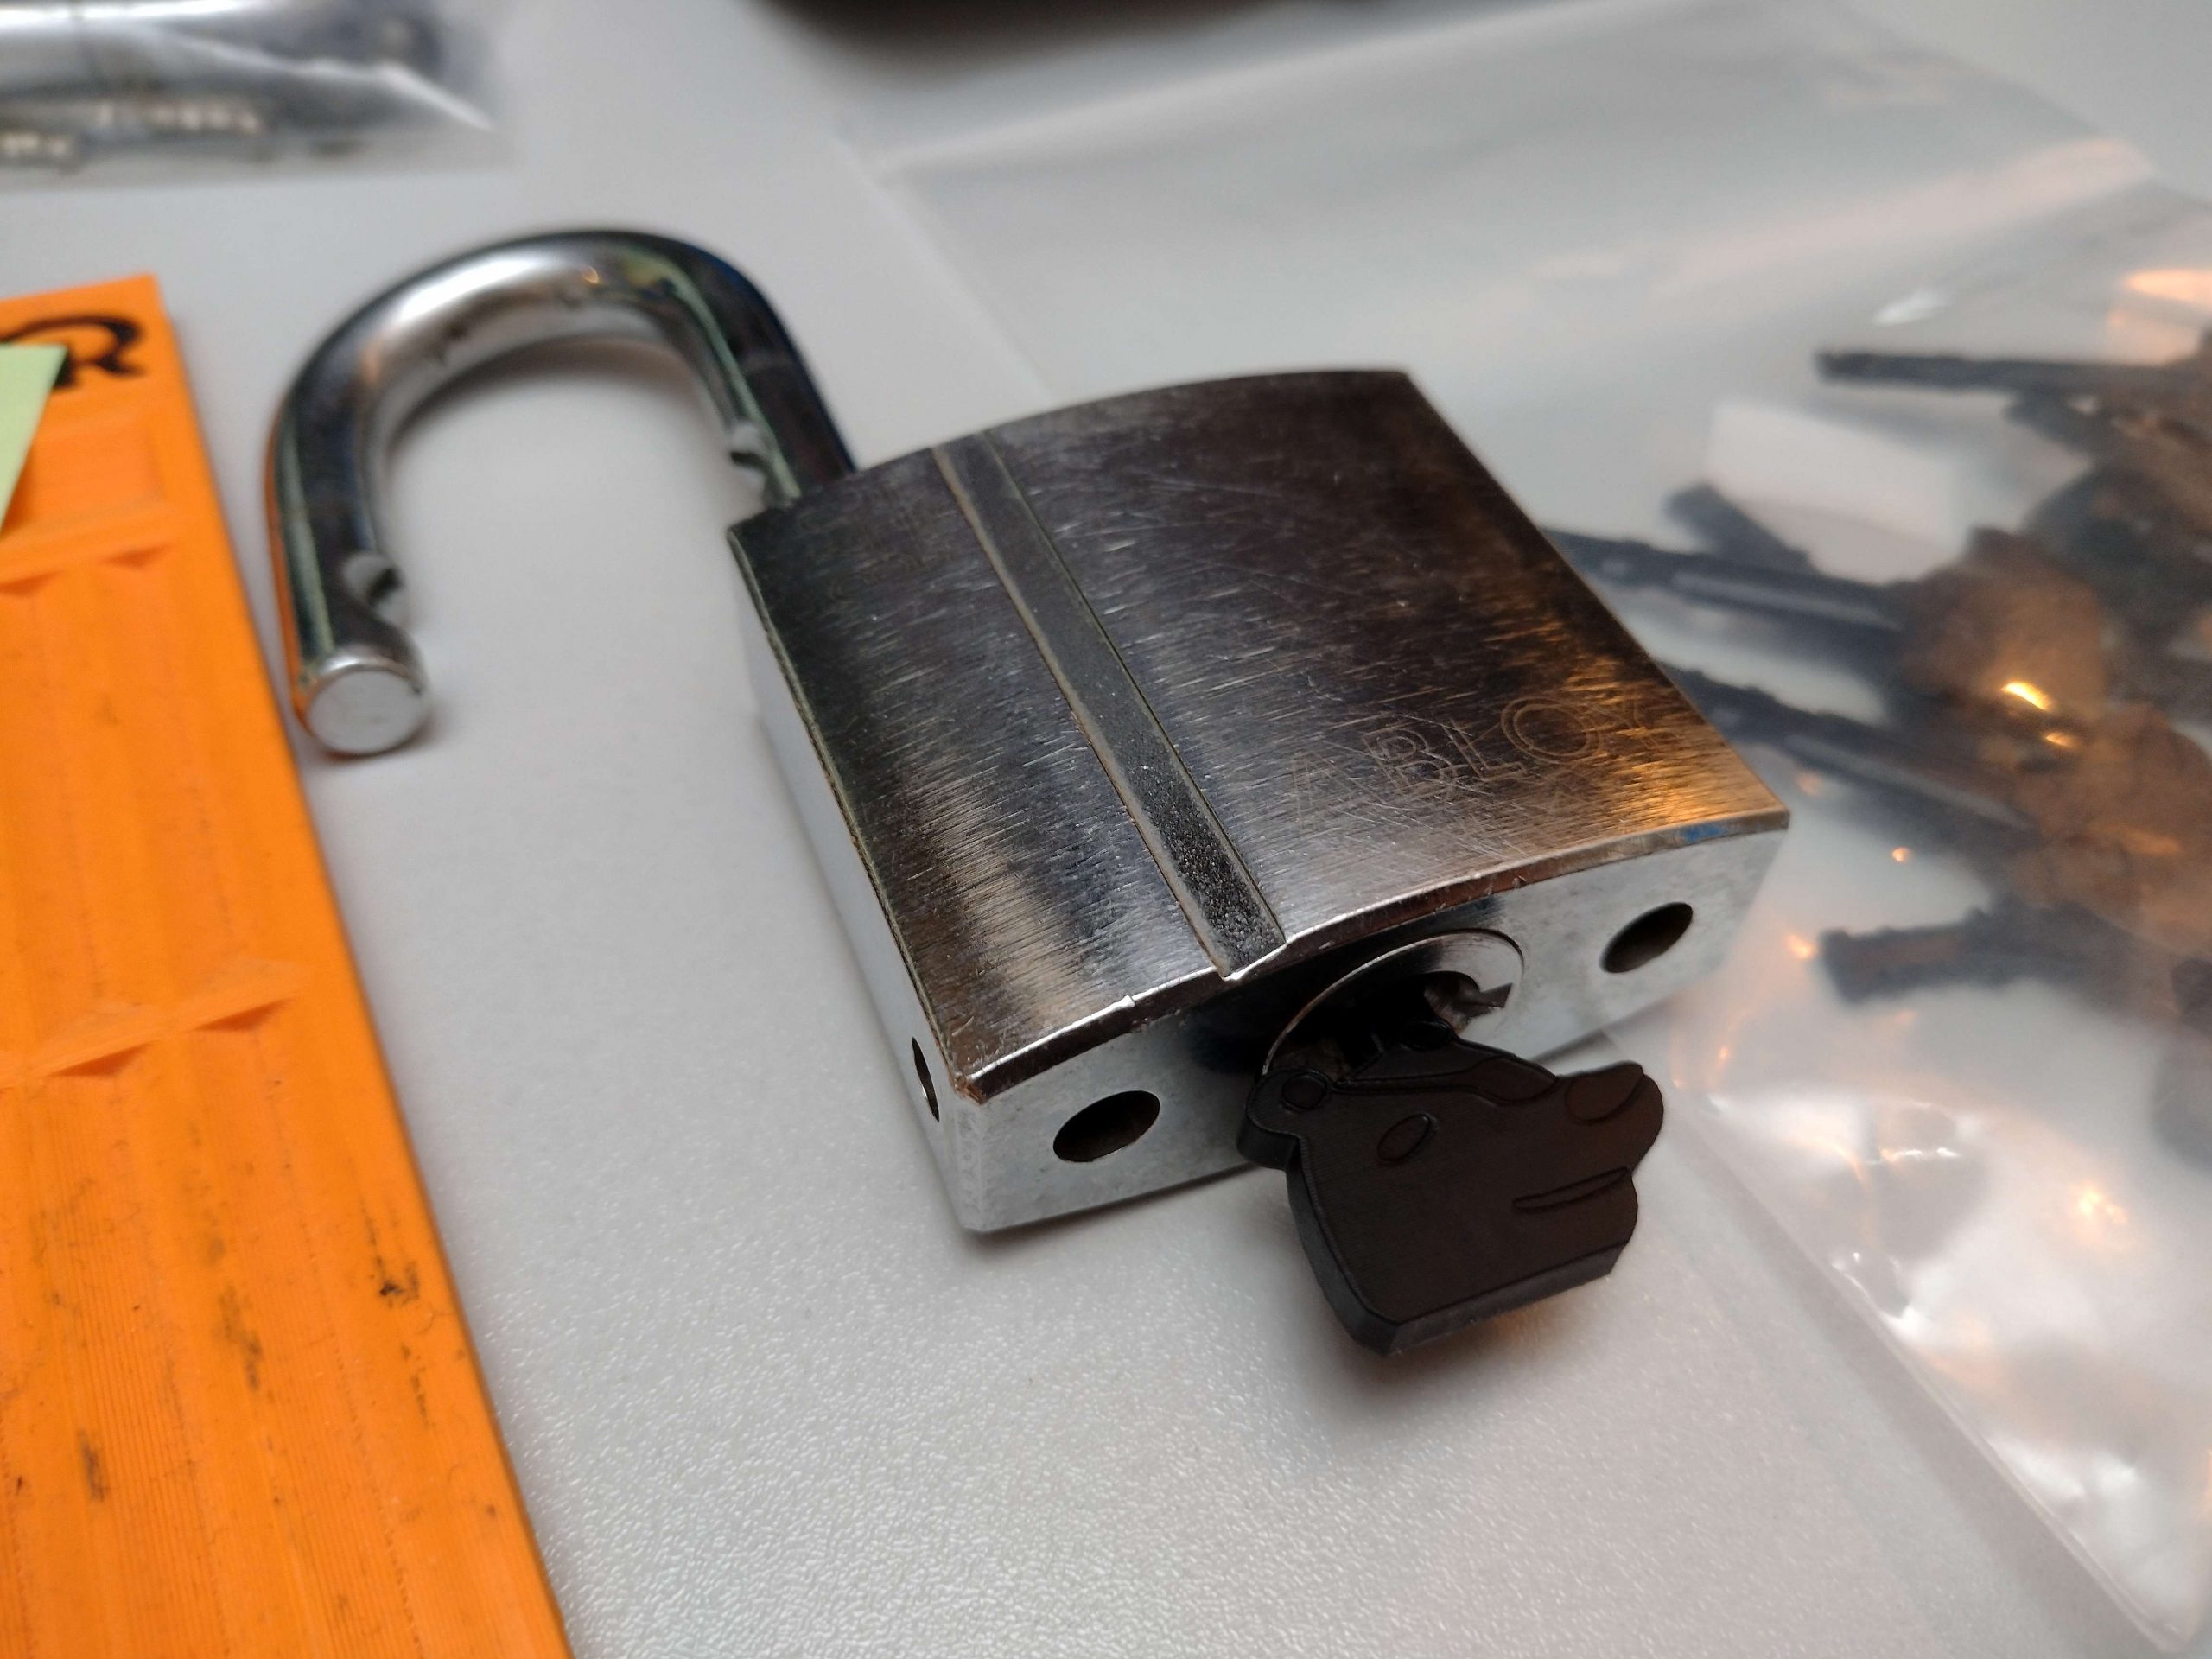
The PL340 are beefy padlocks of around 55*50*25mm, very much excess for any normal consumer applications. While we like them for securing Peli cases, they’ll work fine on your motorcycle or shipping container as well.
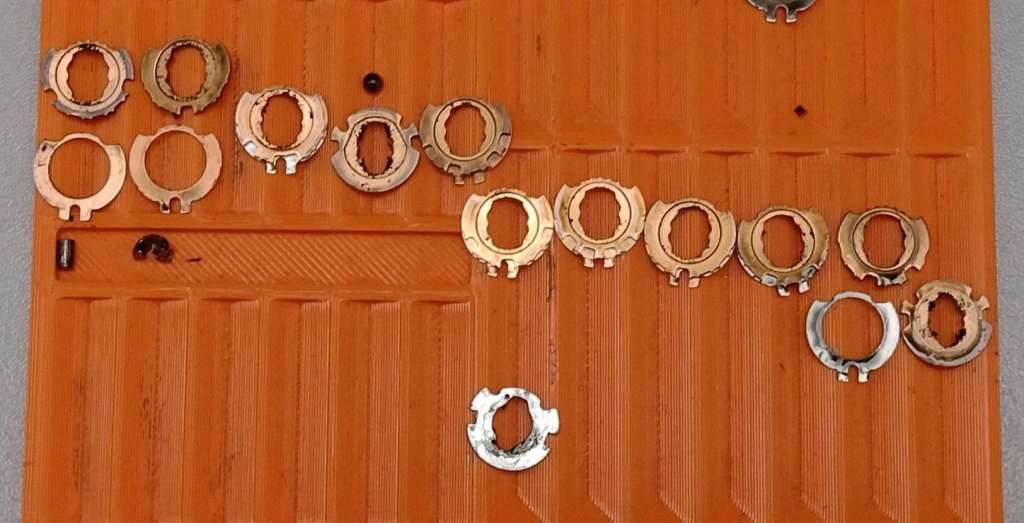
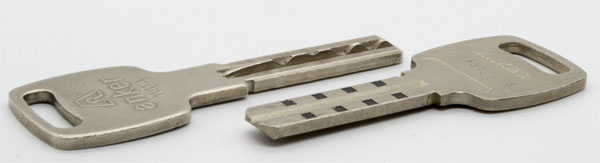
The key making process started by decoding the several non-working keys in the package keys. While five cuts were shared between the keys, it wasn’t enough to determine what the keys should be. One lock was disassembled and the disks were decoded according to the pictures in the Protec2 white paper by Han Fey. (Reinder has published a better chart on 22nd of September 2023)
The Protec2 has eleven disks, of which the fourth and eleven are zero disks. All code disks have two true gates, except for a six with one true gate. We see four disks with more than two true gates, which means they are mastered and accept a key with either cuts on it.
I’ve opted to use Python to create a list of all possible keys in this system instead of using pen and paper. After I had a working solution with many nested loops, I found the function product in the itertools package to generate a list of solutions in fewer lines of code. The code below generates and prints the valid keys from a list of lists with possible bittings.
# bitting_mks.py
# Quick script to get all possible keys from a single master keyed lock.
# 20230730 Jan-Willem CCBY4.0 Toool NL

import itertools

# The key codes is a list of list of ascii characters.
key_code = [['0'],['5'],['4'],['6'],['3','5'],['1','6'],['1','3'],['0'],['5','6'],['6'],['1']]
keys = list(itertools.product(*key_code))

for key in keys:
	print("".join(key))
This script should work for most key systems. For me, it generated the sixteen valid keys of this master keyed system. With Reinder’s online generator, I’ve generated the files. As I lack a printer capable of printing these, I used the 3D printing service from JLCPCB. Reinder had good experience with Imagine Black, so that was my starting point as well.
Reinder’s tool for generating the keys isn’t widely shared, yet. He has shared a video in which several more 3D printed keys are showcased, including a few which work better than the online generated keys. Several other scripts (By NVX, and bgrydon) are available online, but they don’t work as well as this work.
Uploading the models it to the service was quite tedious. Not only does the material, finish, and customs description need to be filled in for each print, QA was quite picky, and rejected the files several times. After some touch ups in Meshmixer, the keys are ordered. 3D printing keys was very affordable.
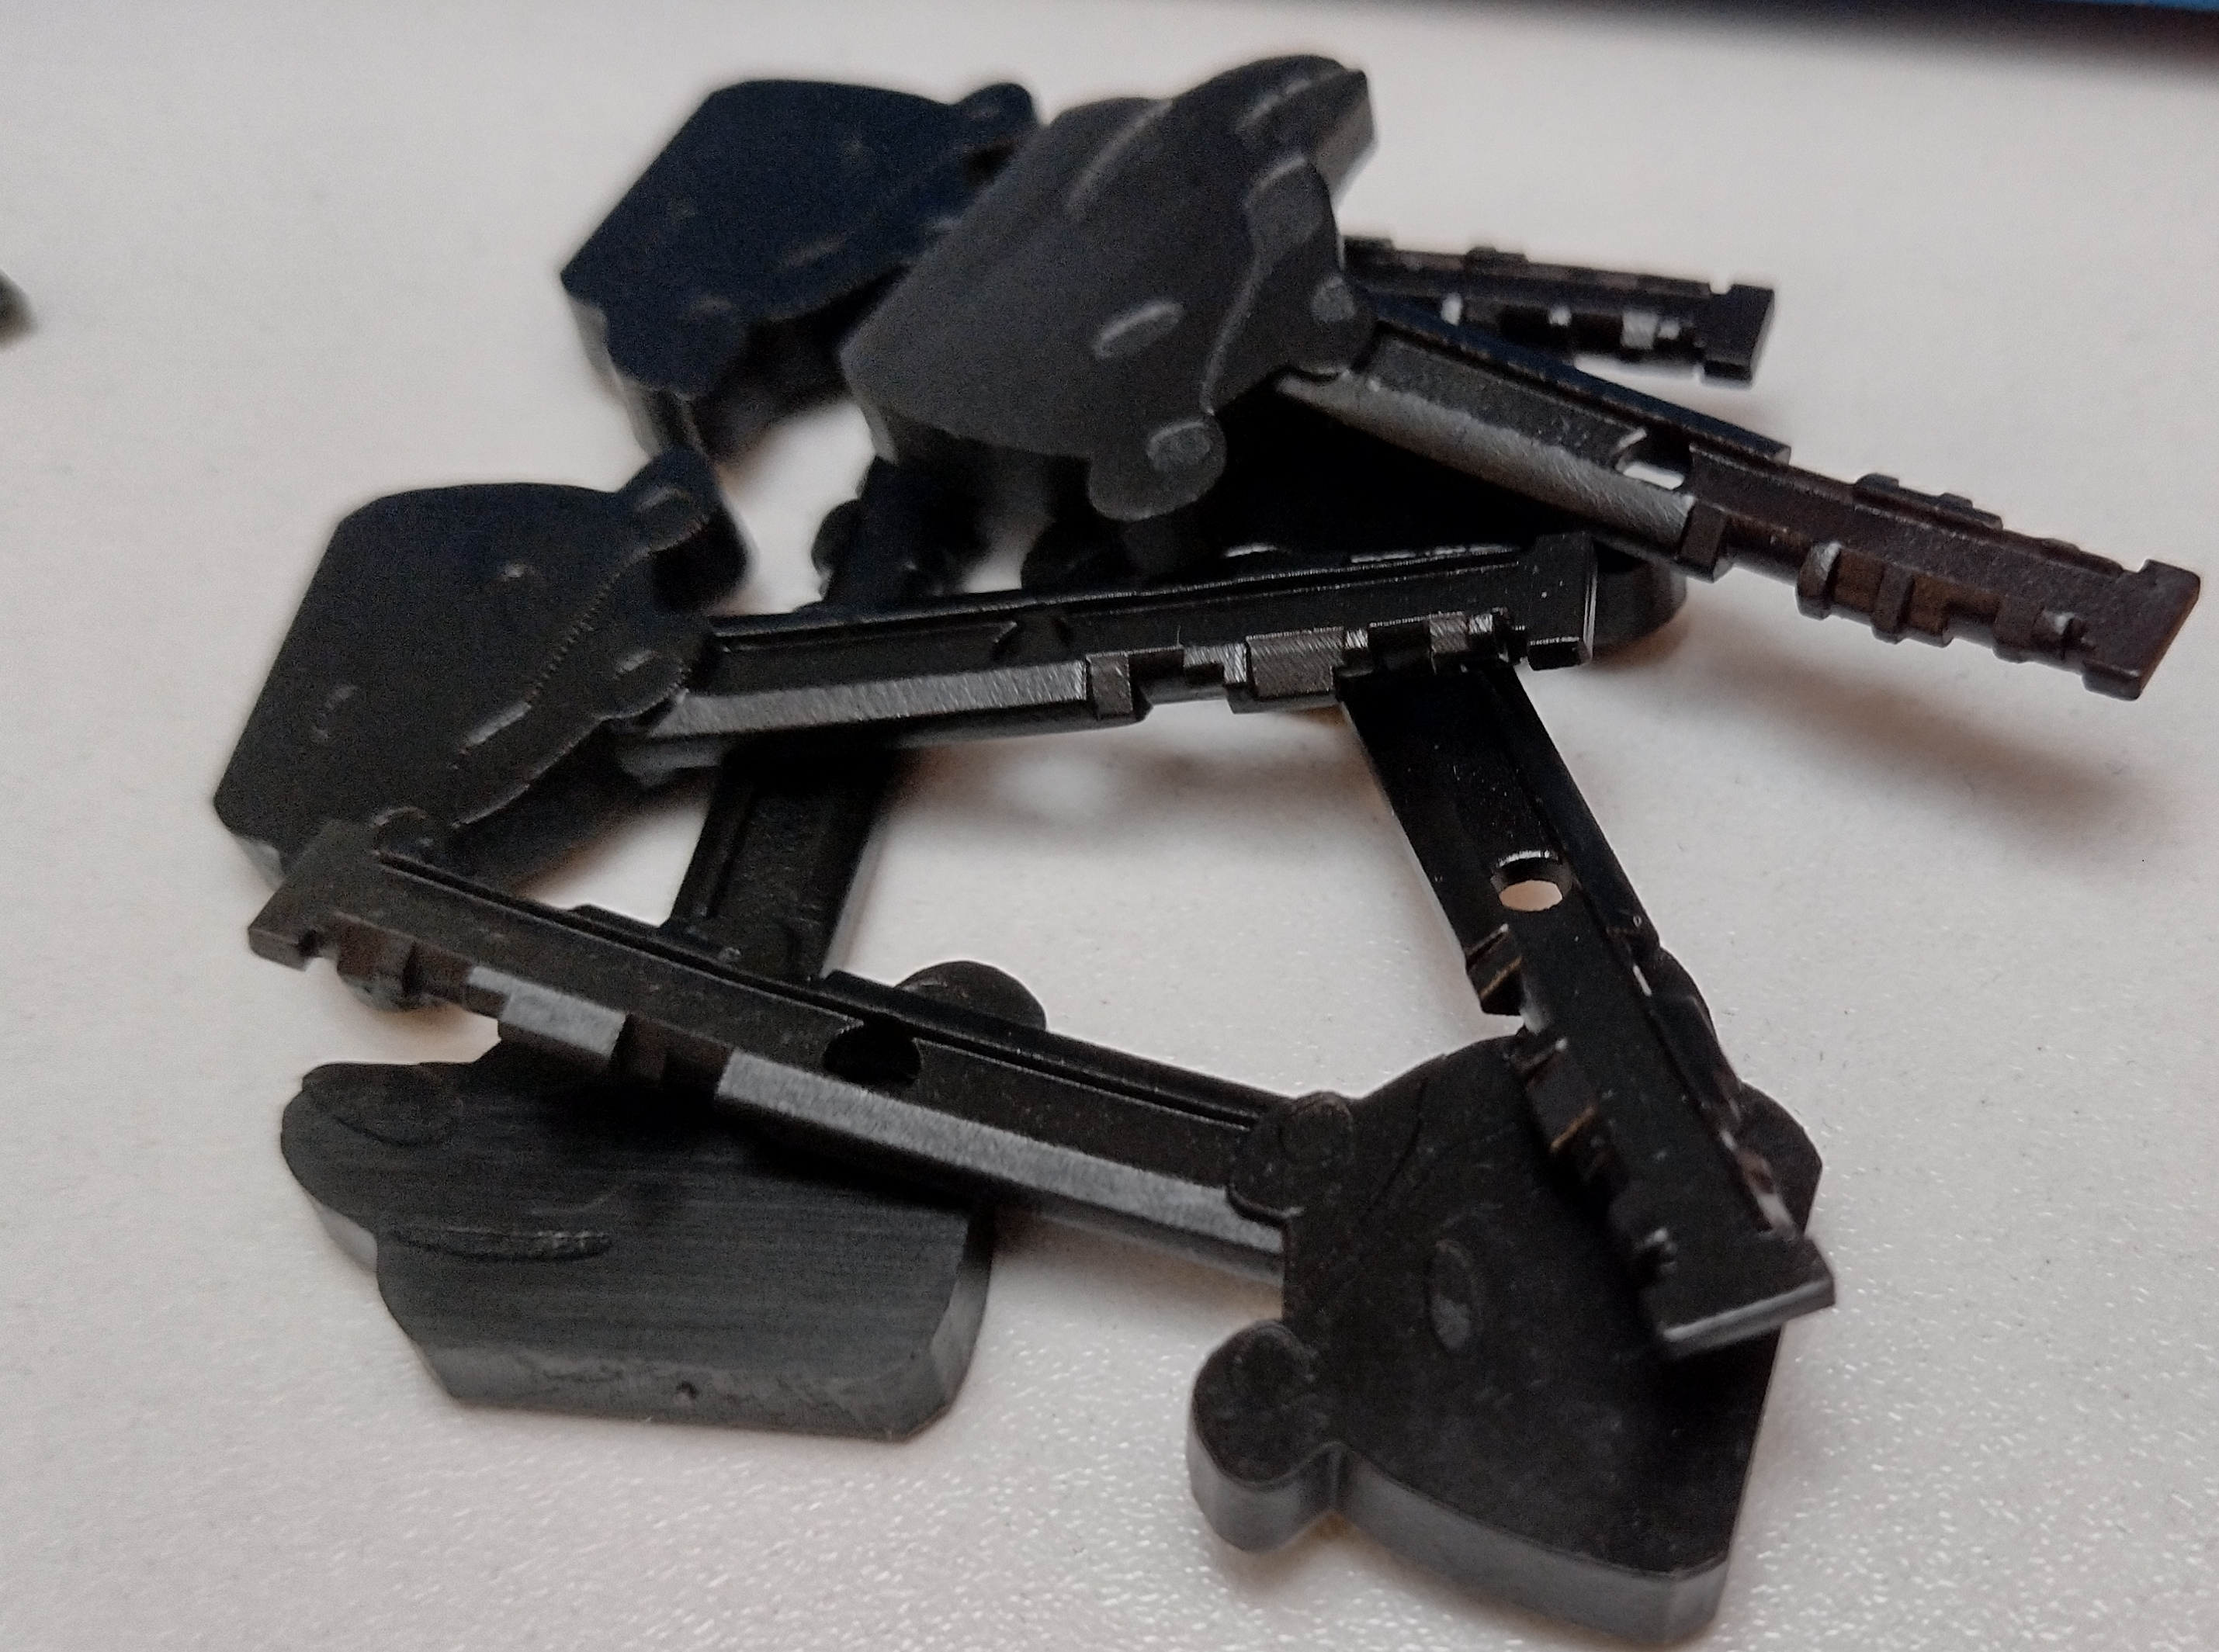
The prints came in after a couple of weeks and look great. As the print doesn’t have a captive ball bearing, I’ve removed one from a non-functioning key. Sadly, none of the keys worked of the first print run. After double-checking the data, I’ve found a translation mistake. One disk was flipped in the picture, where a disk five becomes a three.
After going through the process a second time, the keys opened the lock I decoded. Possibly a bit more surprising, two keys worked on all other locks as well. So these are the master keys of a system bigger than these nine locks.
While it’s a great success, and defeating this system with 3D printing, I think we can do much more with this locking system. I’ll likely revisit the work of Matt Smith, to attempt to pick it, or at least try to find a better way of decoding the locks.
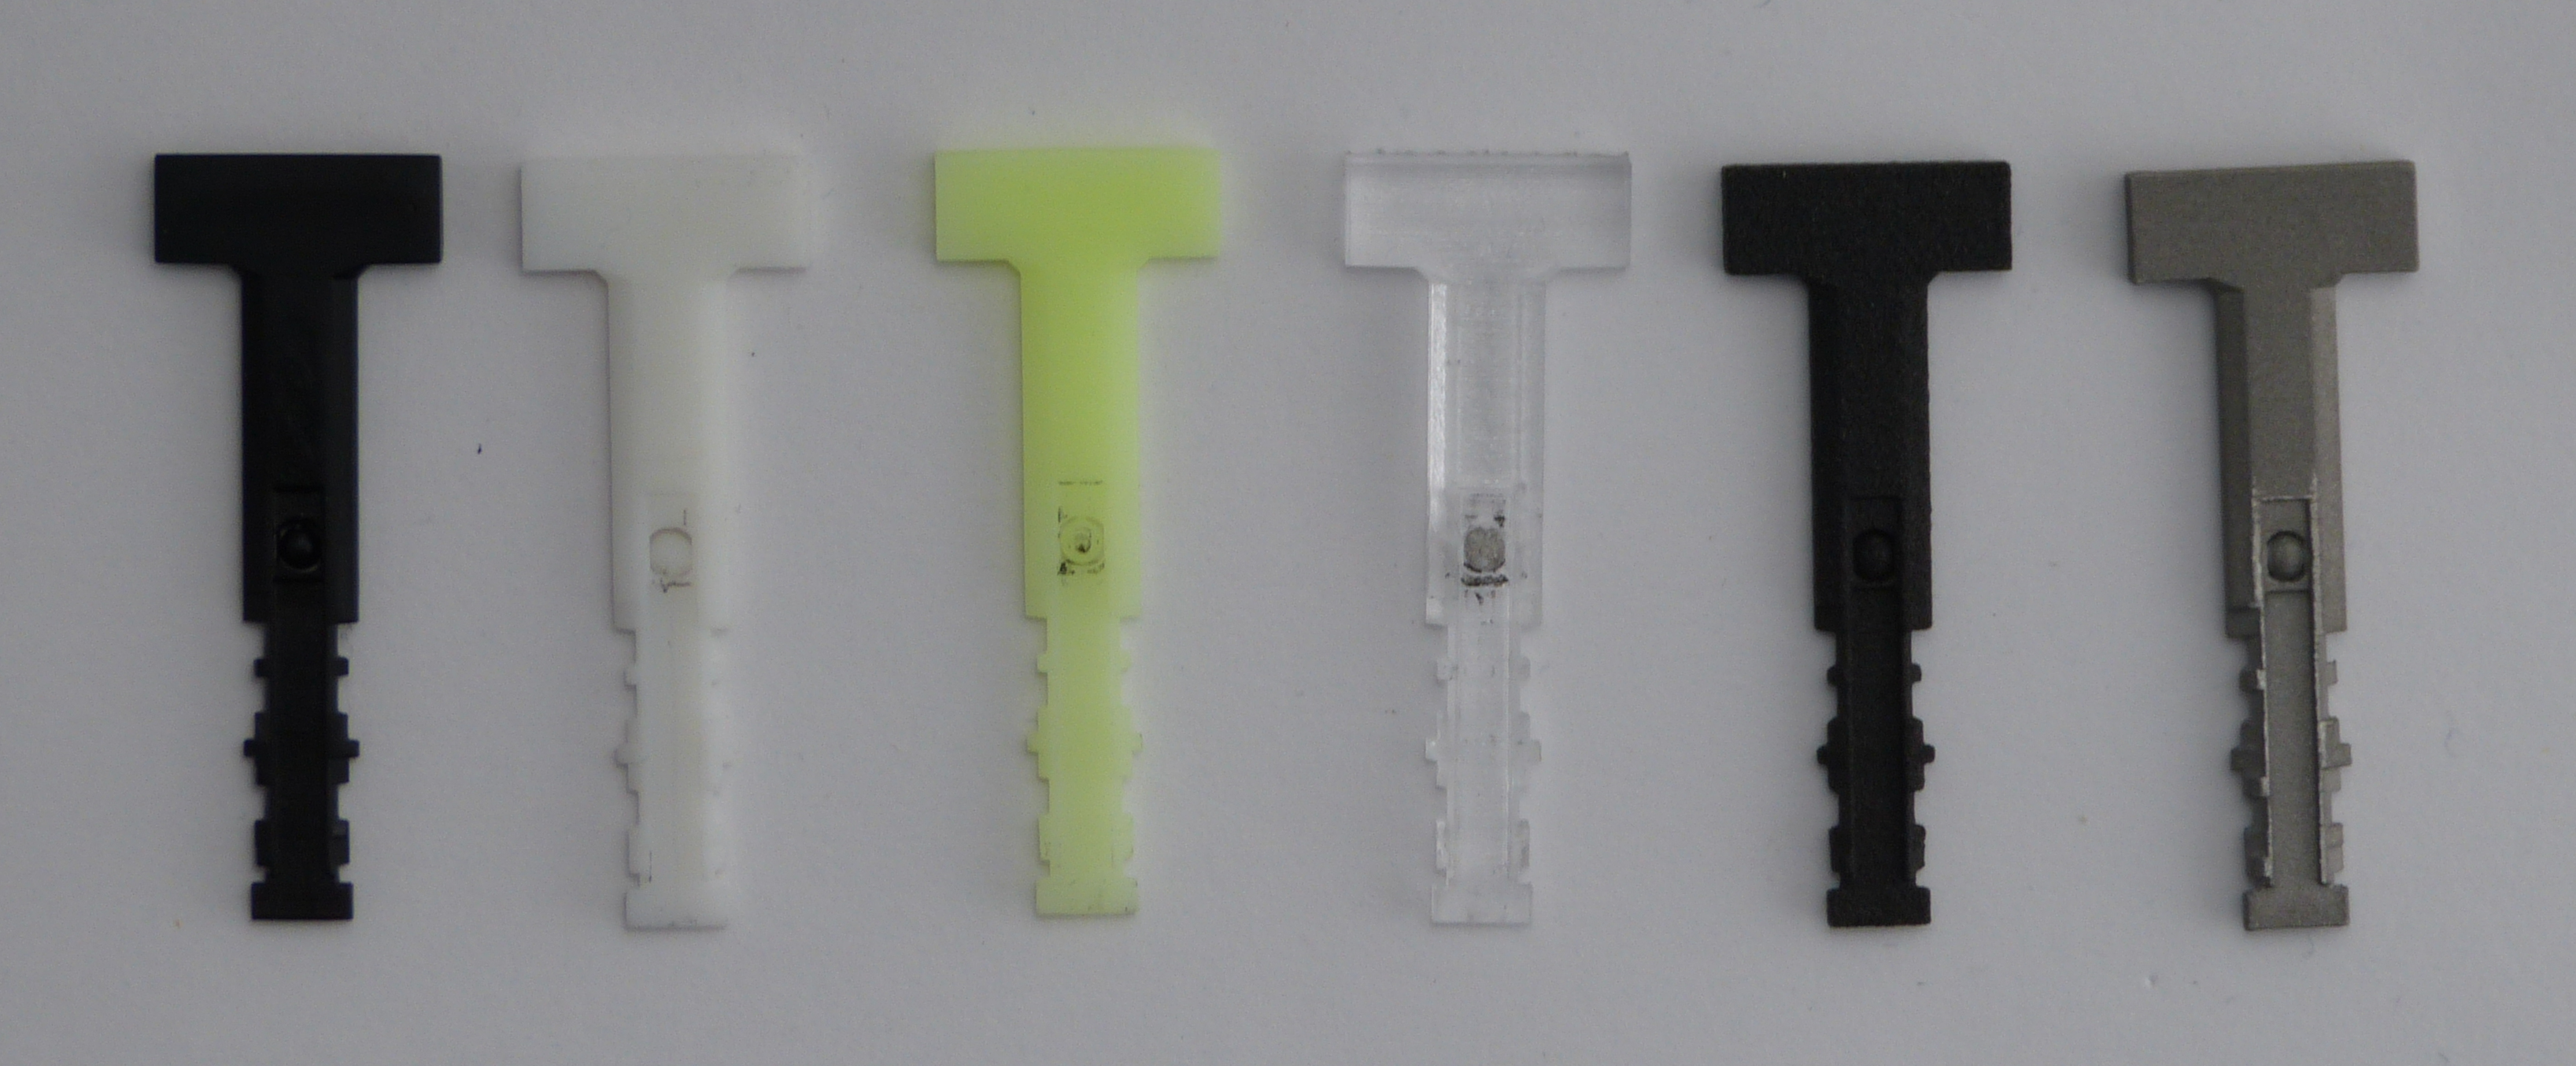
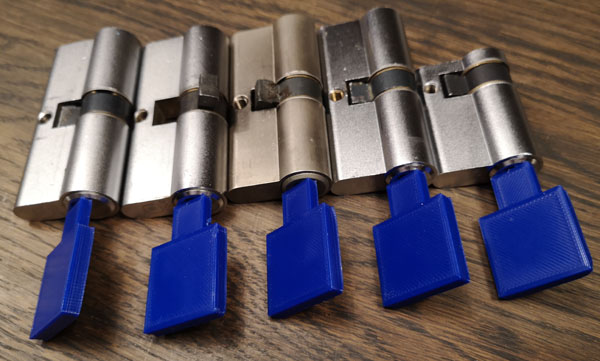
To settle one curiosity, I’ve commissioned new prints generated by Reinder in several materials. These have a captive ball. From left to right, we have: Imagine black, 9000R Resin, 8228 Resin, 8001 Resin, 3201PA-F Nylon, 316L Stainless.
All the plastic keys were dimensionally correct and opened the lock. Of course, the engineering resins work much smoother and are generally stronger. The 8228 seems to be very good, except for the ugly color 🙂
So, what about the metal key? While it is amazing we can have these parts fabricated for €8 per key, the dimensions aren’t there yet. The key is slightly oversized and doesn’t fit the keyway. Of course, you can order keys with several different scaling factors, but it’ll be expensive, whereas the resin prints work well and are relatively cheap. In the end the resin keys are around €2 each, and I’ve spent about €200 on the whole project.
While it’s exciting to ‘defeat’ Protec2 locks with this attack, it’s more a showcase of skill and dedication of people in the locksport community. Thanks, Reinder and James, for allowing me to use this work.
This text and the pictures are CCBY4.0 Jan-Willem Markus, Toool Blackbag. The copyright of the key generator is with Reinder Stegen and James Wah.
Posted in Keys, General, Decoding | Comments Off on 3D printing keys for Protec2
I had spent quite some time on the Anker 3800 cylinder. This system was originally patented by the Japanese firm MIWA. It contains just 4 pins, each of them having 4 possible depths. But, there’s also 4 sliders that are magnetically operated by magnets in the key.
An Anker 3800 EurocylinderThe keys
This system was sold in the Netherlands by Dutch firm Ankerslot and is still used in many large, high security setups.
I made a magnetometer to decode the magnets in a key or in a cylinder, made a 3D model of the key to be able to print it and figured out how to get the master key of a system. My talk at Disobey is available online.
At LockCon, Han provided me with a set of five cylinders, all keyed differently but all part of the same masterkey system. No keys were provided.
I started by reading out all the magnets in the sliders. Each slider can have one or two magnets. If there are two, one is for the user key, one for the master key (we’ll ignore submasters for the moment). By knowing the magnets in the cylinder, it is possible to figure out which magnet should be in the key. For master keyed systems, there might be two possible magnets to operate the slider, where one will be in the master key, the other in the user key. With this information, I could determine the magnets in the master key and in the individual user keys (for each slider, there was only one possible magnet that would open all cylinders, so it was clear that that particular magnet should be present in the master key).
The correct bitting is another story. I had no key to start with. It is possible to create 256 keys and try them all to find all possible bittings. I was lucky however to have gotten one half cylinder.
What I did is create a bump key (so four times the deepest cut, which I will call a ‘4’), containing the correct magnets. With the bump key, I could open a cylinder and disassemble it. The half cylinder was my luck, as that can also be re-assembled. For this task, I used a 3D-printed plug follower.
This gave me all the correct bitting positions for this one cylinder (pin 1: 3 or 4, pin 2: 1 or 3, pin 3: 2 or 3, pin 4: 4). Since I did not have the original key, I did not know which depth belongs to the user key and which to the master key. The configuration allows for 2^3=8 possibilities. By creating 8 keys and trying them on the other cylinders, I could find out the master key bitting. With 3D printed keys, it is possible to print, say, a 3/1/2/4 key and if it doesn’t work, file a bit away to get a 4/1/2/4 key. That is exactly what I did and 4/1/2/4 worked on all cylinders, giving me the correct master key.
Next, I wanted to create the user keys. I could have created user keys by only using different magnets and keeping the bitting the same, but that would not give me the keys as they would originally be made for these cylinders. Since I now had a working master key, I could easily probe each pin position for all depths in sequence. I started with a 1/1/2/4 key, trying that on the 4 remaining cylinders and writing down the results, then filing it to a 2/1/2/4, trying again and then 3/1/2/4. With four keys to start with and 4*3=12 filing actions I was able to decode all the bittings.
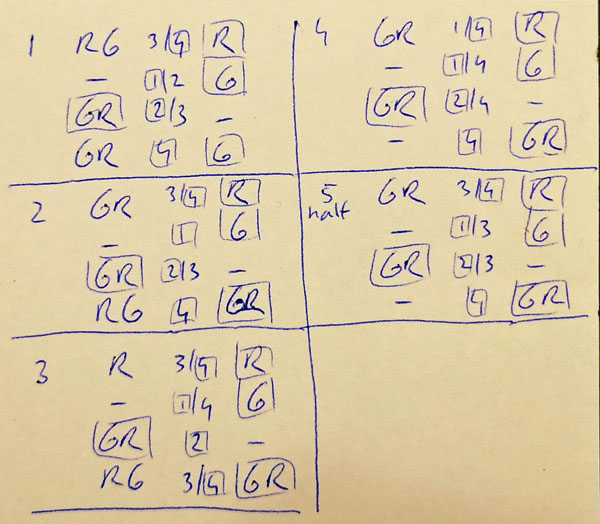
Decoded cylinders, ‘G’ and ‘R’ are north/south poles (my magnetometer uses green/red light as an indicator)
Here, I have put squares around the magnets and bittings of the master key. If there are other bittings or magnets, they must be in the user key. The first pin of cylinder 2 for instance has possibile depths 3 and 4, and the master key has depth 4, so the user key must have depth 3. Note that in this system (and in this instance), user keys can have a bitting that can be filed down to the master key, as long as the magnets are different. Cylinder 2 shares the middle two magnets with the master key, the outer two are different.
With that information, I knew all the individual keys and printed them.
The user keys only open one cylinder each
And I have the master key.
The master key is golden of course
In fact, with this collection of cylinders, it is now also possible to make submaster keys for certain subsets of cylinders, even if that was not intended originally.
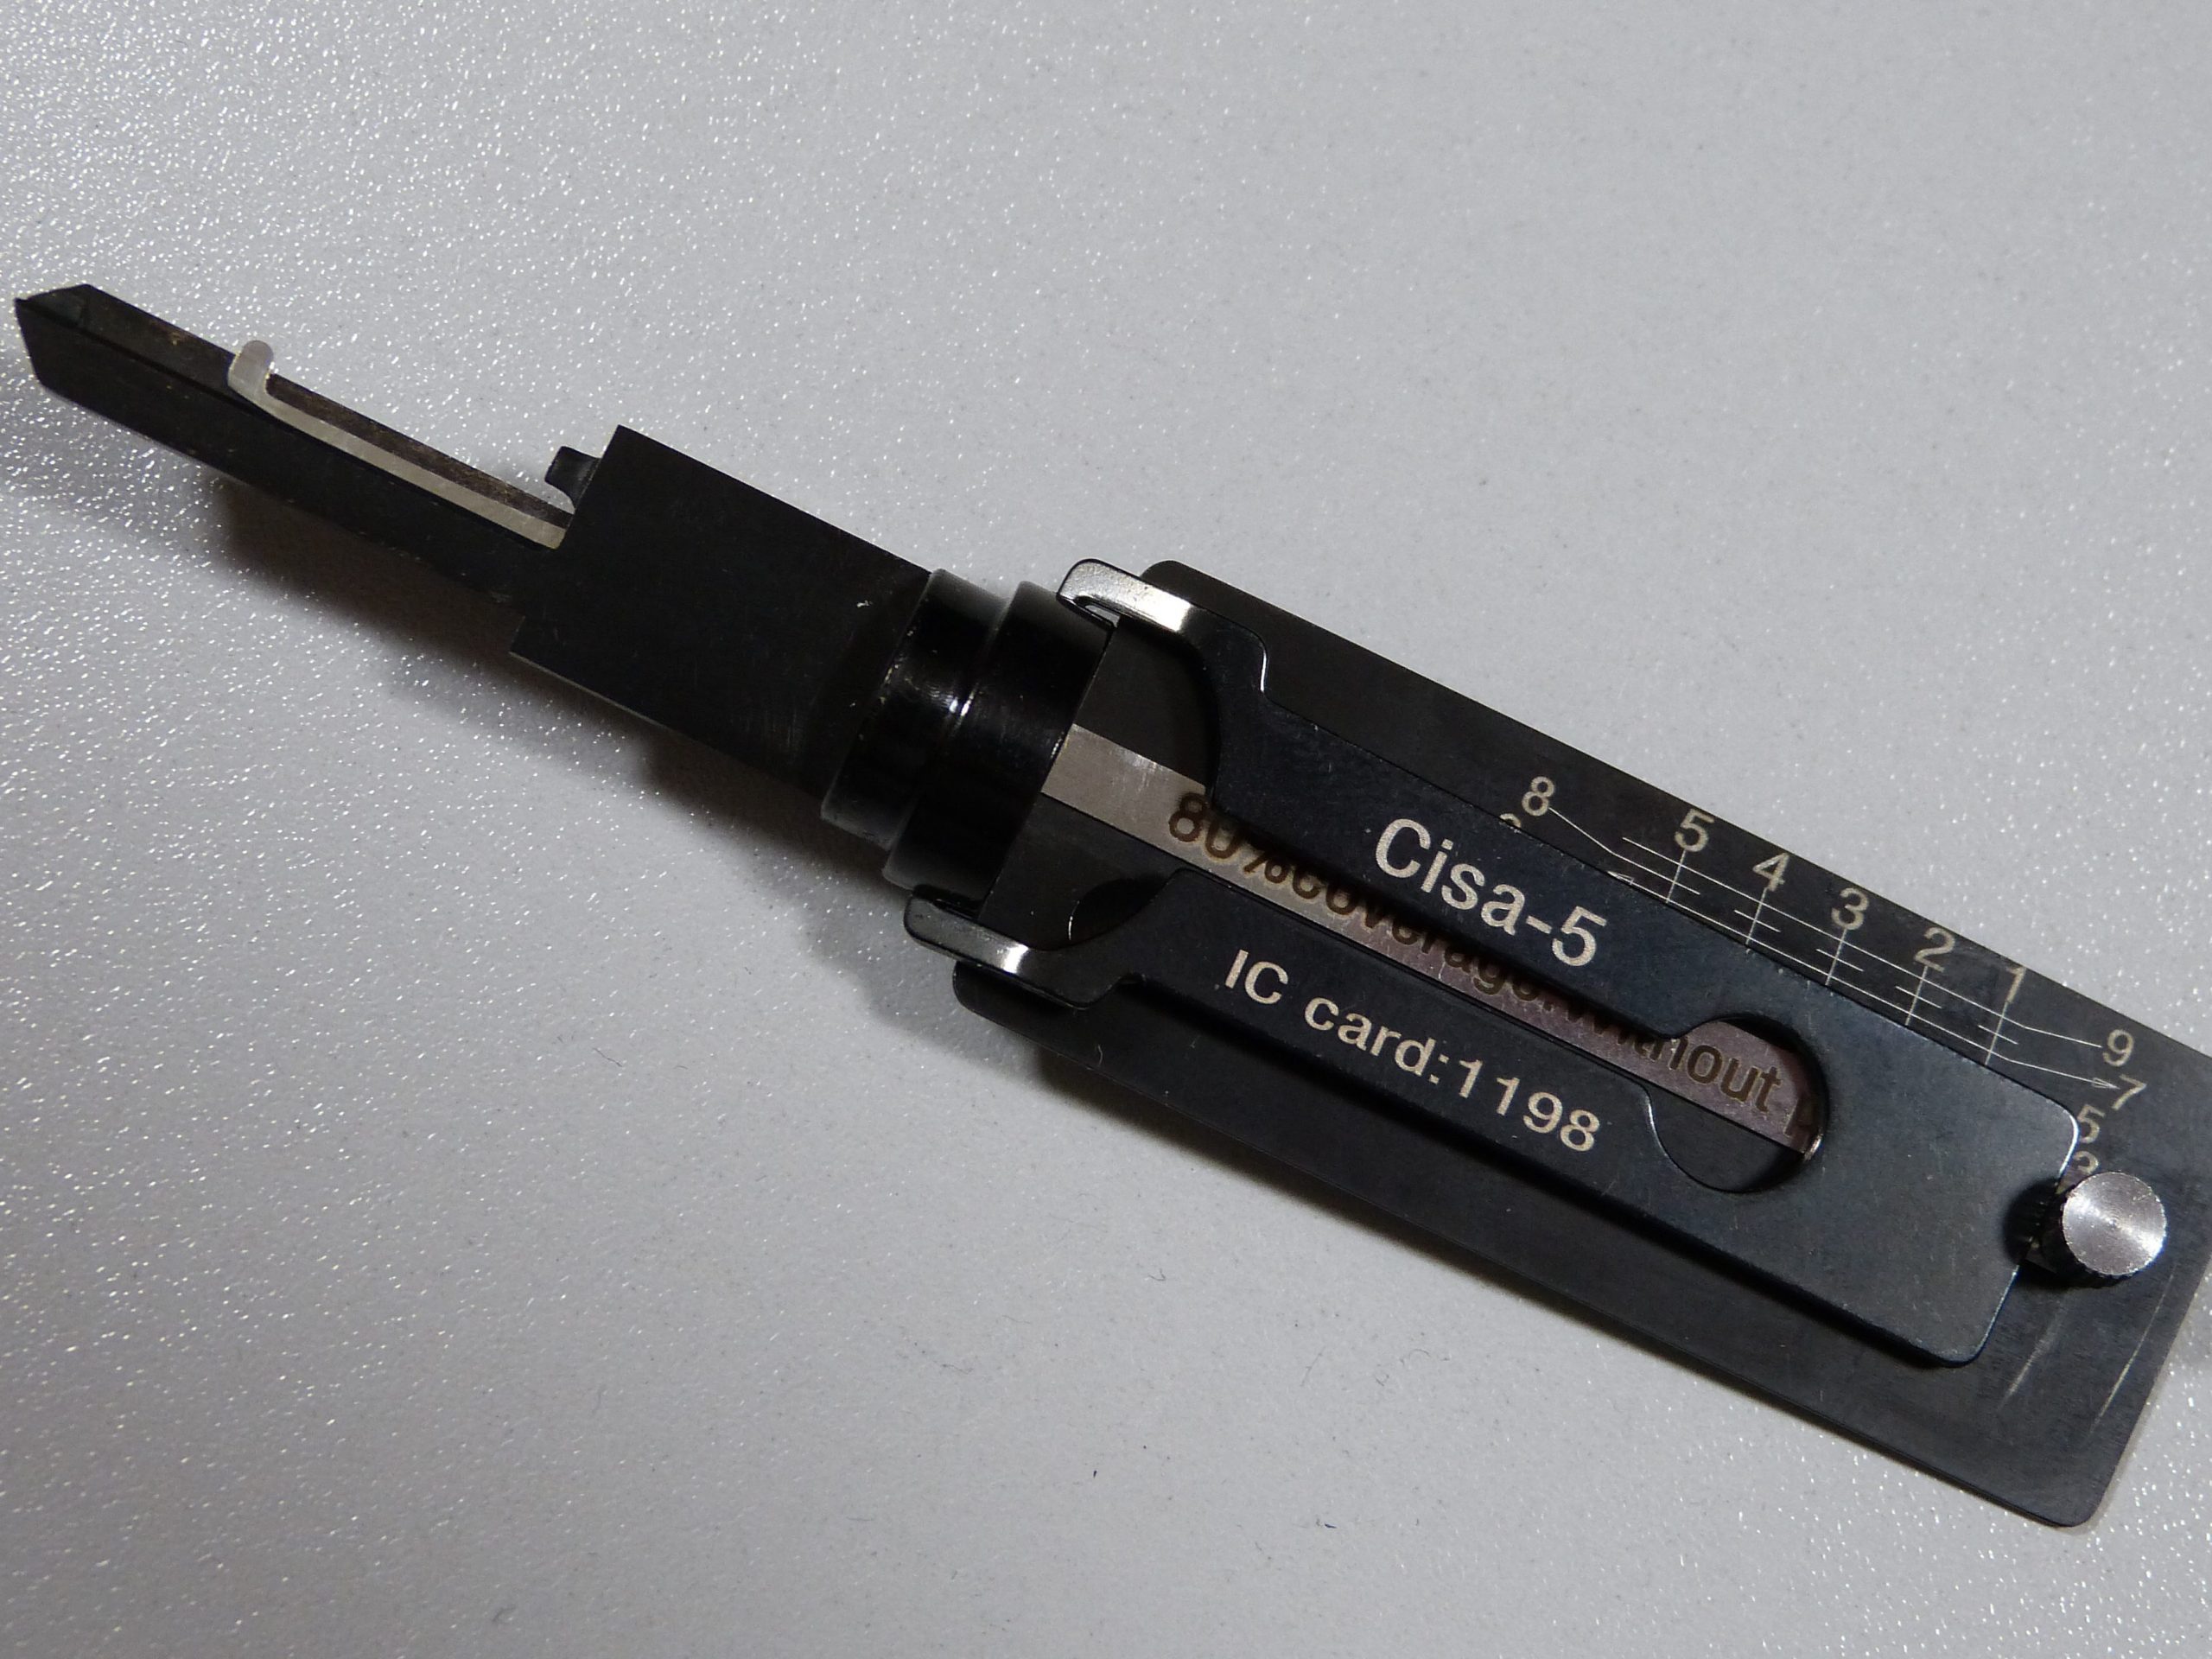
Lishi 2-in-1 have been around for a long time, both for automotive and more recently for pin tumbler locks. Sadly, these tools are quite costly as they are keyway specific. Furthermore, this type of tool can’t be made for some locks as the keyways are too tight. Or so I thought, as of writing there are several 2-in-1 for sale for the paracentric Yale keyway. As I was intrigued, I’ve bought an off brand 2-in1 for CISA. In testing the tool, I’ve found various limitations that might impact the usefulness of this tool.
Let’s start from the beginning, Lishi is the brand name of a series of lockpicking tools designed and made by Zhi Qin Li. The Lishi company split up and Zhi Qin Li still sells his 2-in-1 under the brand Original Lishi, while another company sells them under the brand Genuine Lishi.
Original Lishi sells a variety of tools, the one generally referred to as a Lishi is a 2-in-1 lockpick that both applies a turning force and a tool for picking individual elements. The tool can also be used to decode the lock once the lock is open, and a key can be cut in the field with another of Li’s tools.
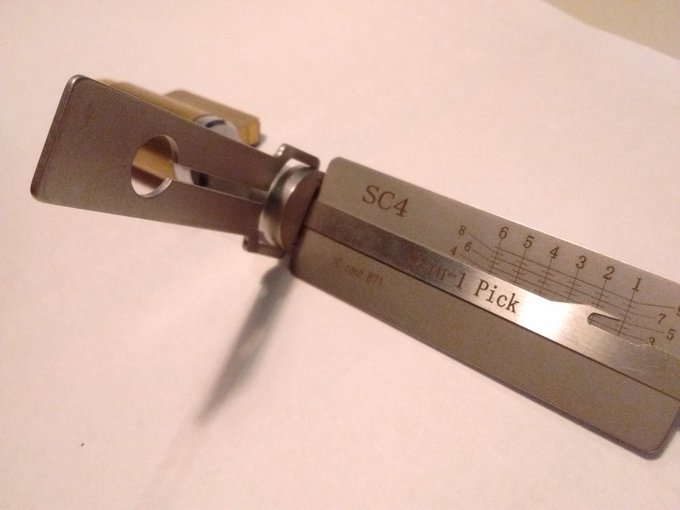
Lishi for the Schlage SC4 keyway.
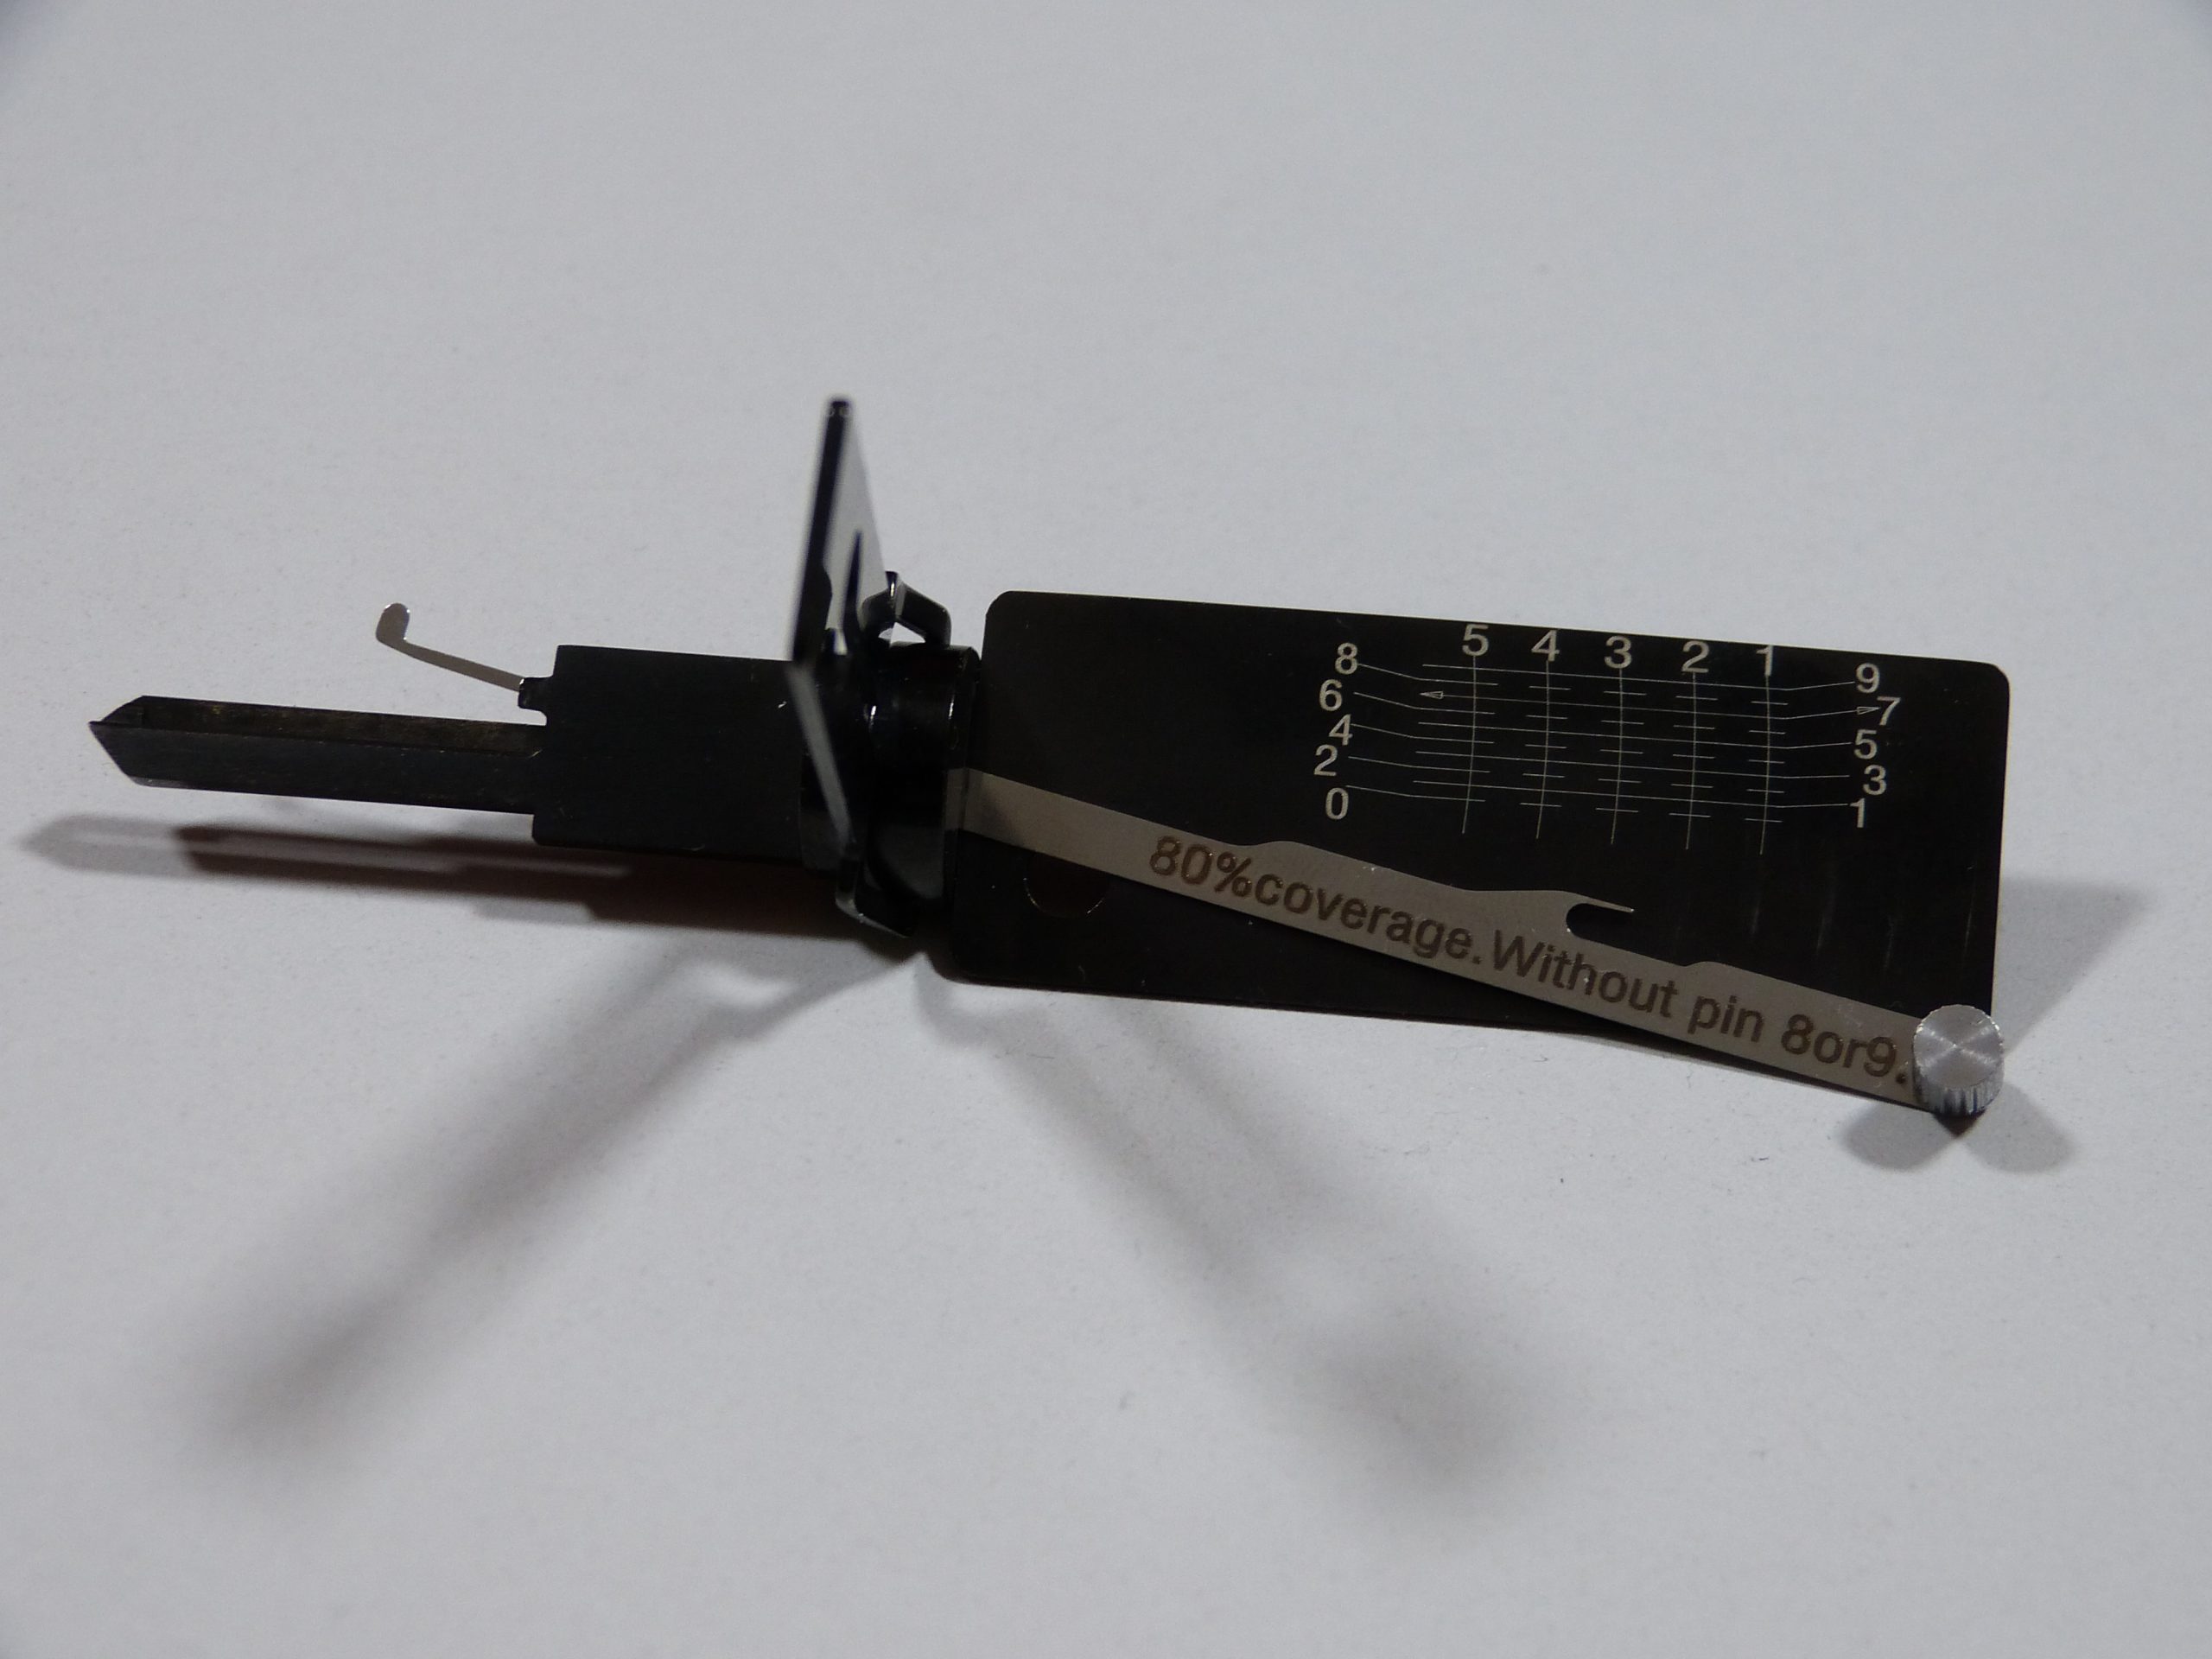
So, what does a Lishi 2-in-1 lockpick do? The tool consists of two parts; the body that is used as a turning tool and the thin feeler that’s used as a lockpick. This in itself would not be too useful, however, the body has a chart of where the lockpick is in the lock. You move the pointer to the desired element, indicated by the vertical lines, and push down lightly on the pointer. This in turn moves the lockpick, pushing down on the element in the lock. You can feel if the element is binding or not. And just as lockpicking, you go through the lock, pin by pin, and feel for the binders. Then you set each binder and search for the next one, until all elements are set. Click on one, click on three… Open!
From y2k these tools have been available for automotive locks as the combination of open keyways, many wafers, and typically low tolerances work very well for this tool. 2015 was the year 2-in-1 picks became available for pin tumbler lock for the USA market. (Schlage, Kwikset, and Master). Most of these locks have wide keyways, low tolerance, and very few security pins.
I’ve played with a few of these tools, but didn’t find them too useful. I’m not a locksmith, not in the USA. For me, they would be mostly a novelty. But the pick I’m about to show can be a game changer as it targets European locks I’m familiar with.
In December, I was notified a seller on AliExpress sells 2-in-1 (not a Lishi!) for the paracentric Yale keyway. The consensus under lockpickers is that this tool could not exist, because the keyway is too tight and has no straight access to the pins. I was curious enough to fork over €50, and bought one for CISA as it’s very close if not identical to the Abus C83, the lock we use for impressioning championships.
The seller is quite open about the tool’s limitations and wrote on the lever “80% coverage. Without pin 8 or 9”. While this sounds like it’ll open 80% of locks, but it doesn’t seem to be the whole story, as we will find out. The biggest concern with a tool that works on a subsection of locks is if the user can detect the tool does not work, instead of user error or lack of skill. I suspect so, but it will be far from easy. In short, a lock will not work with one or more cuts deeper than a 7 and therefore this pin will always be overset and this you can detect.
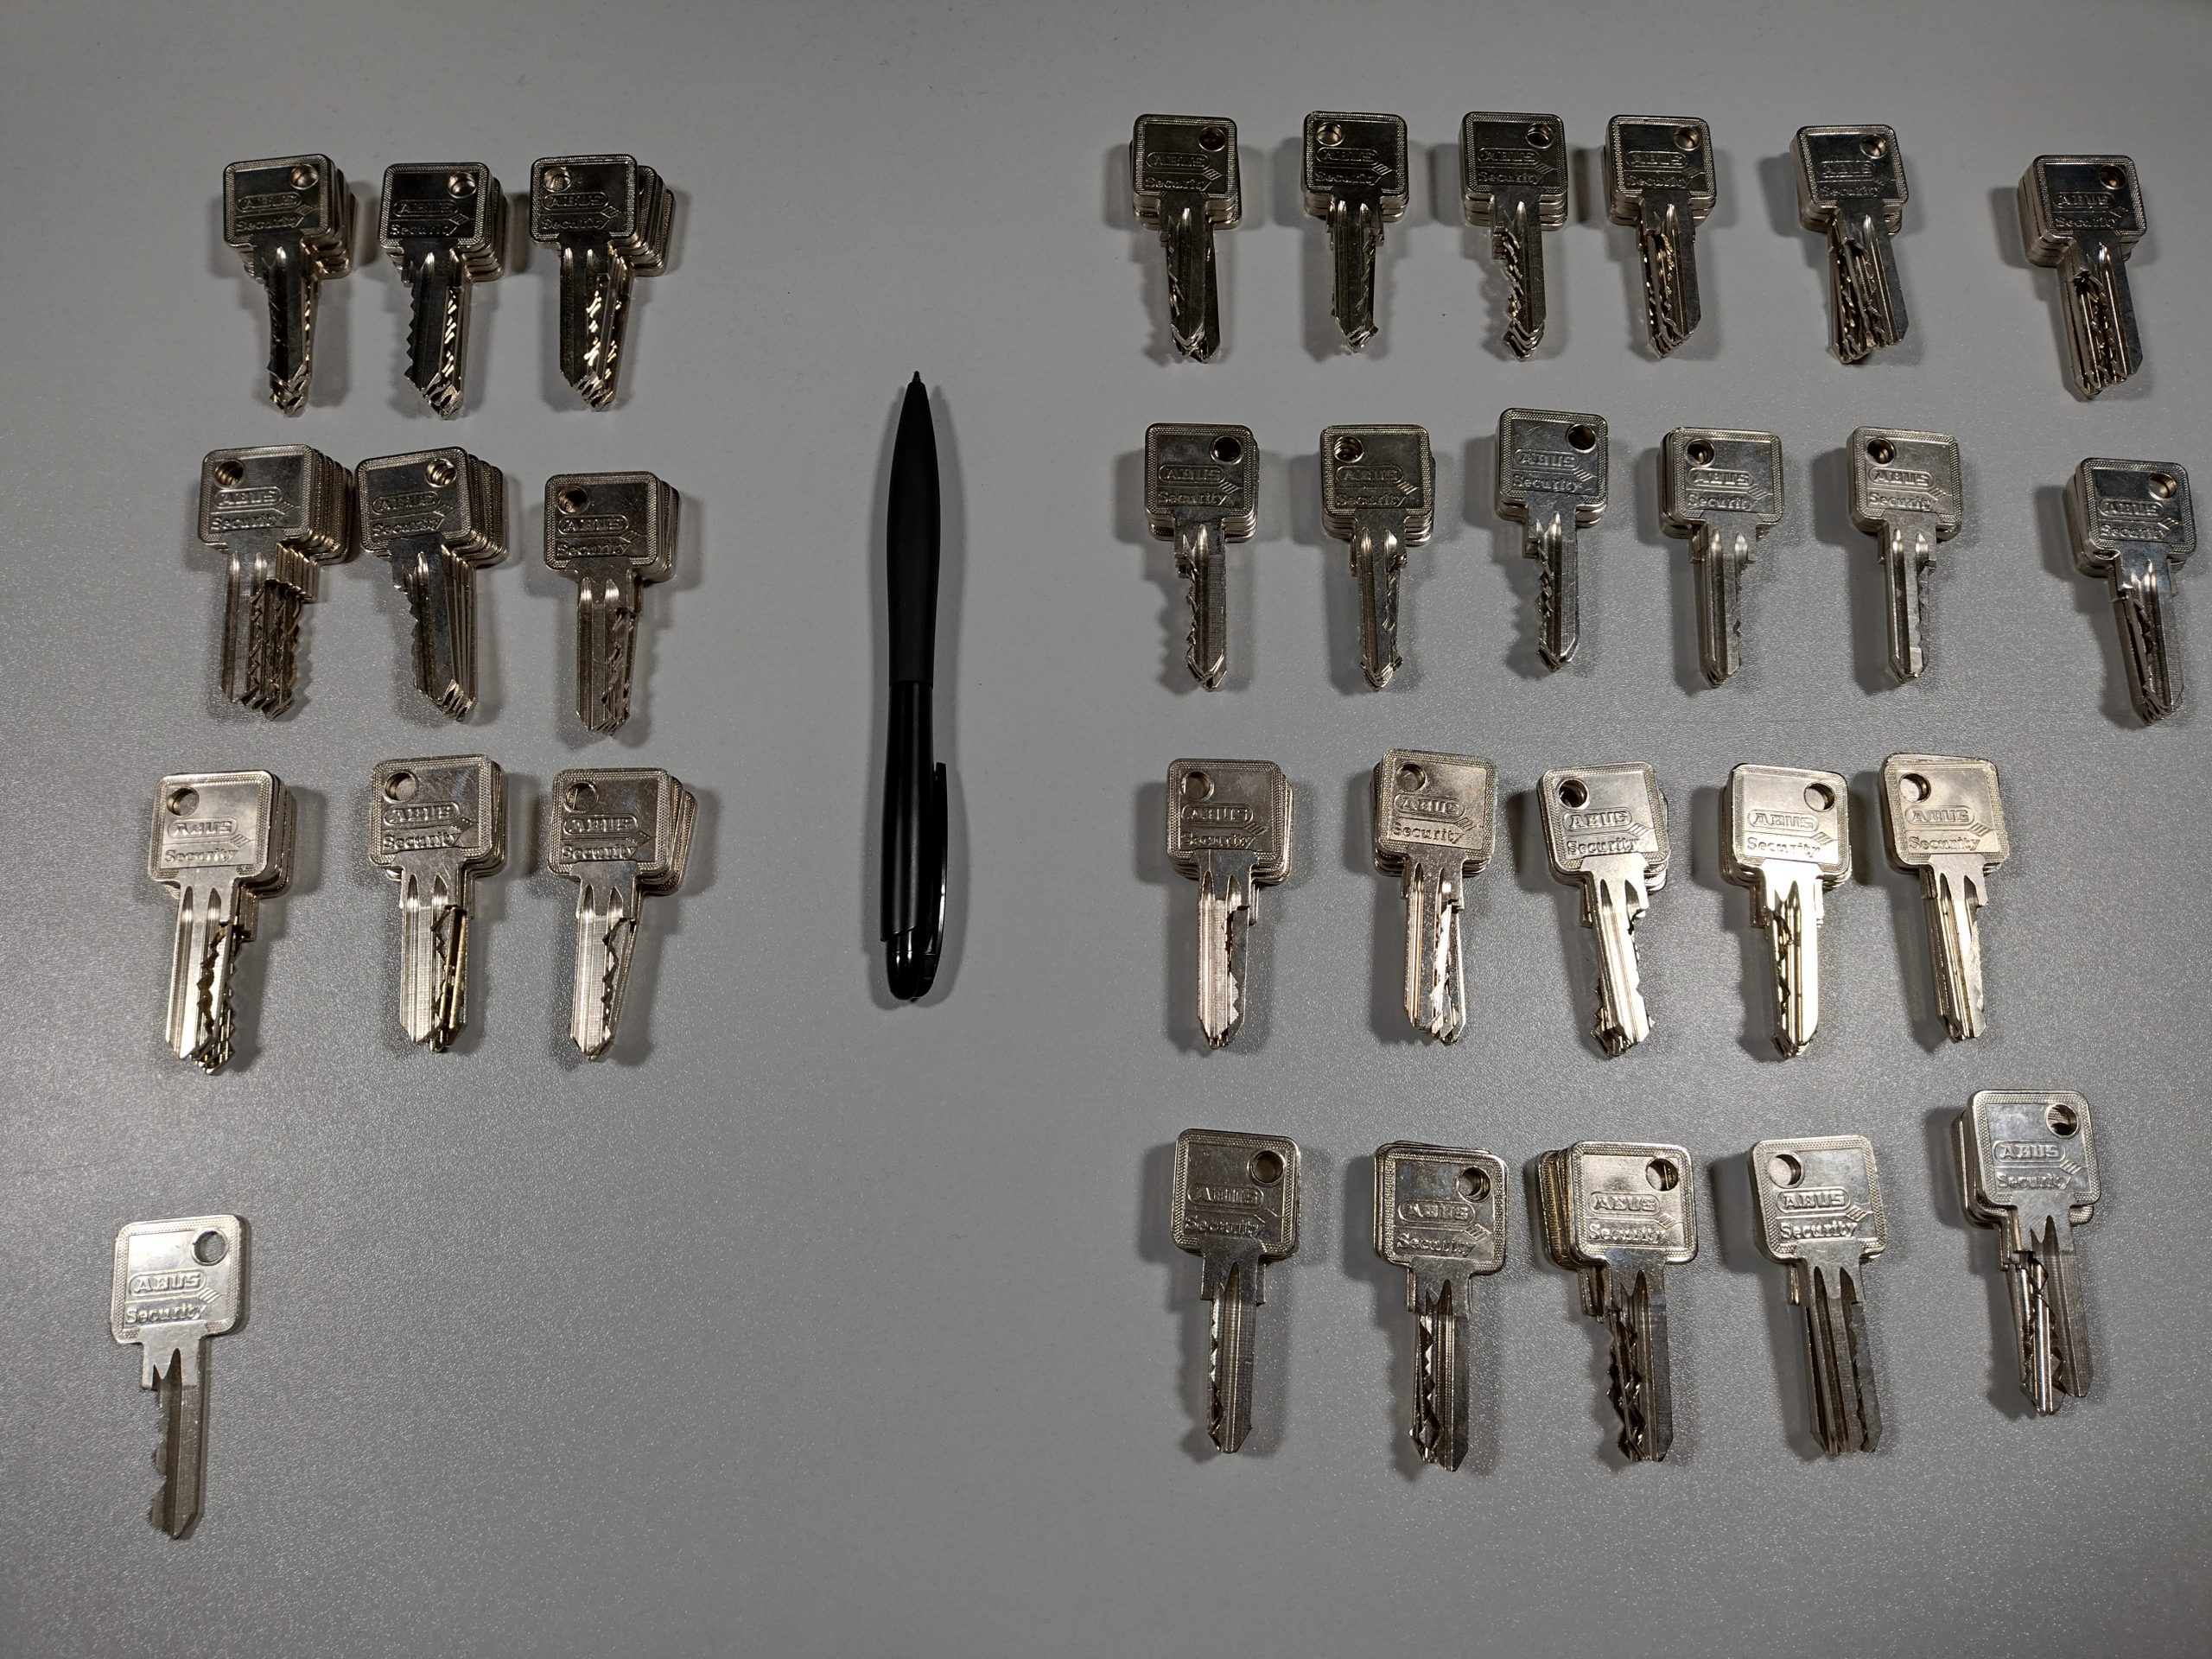
Small sub section of factory cut Abus C83 keys, I’ve a modest collection of them.
As I was curious about the 80% claim, I’ve spent an evening measuring my Abus C83 keys. While these are not CISA, they are close, and I happen to have a modest collection of these keys. 92 out of 283 of the measured keys have no cuts deeper than 5.5mm, the size of the tool. This means the tool will only work on 30% of my Abus C83. This is consistent with a statistics sanity check. For this, we assume every lock has a uniform distribution of cuts, ignoring MACS. This came to be (7/9)^5 = 28.4%.
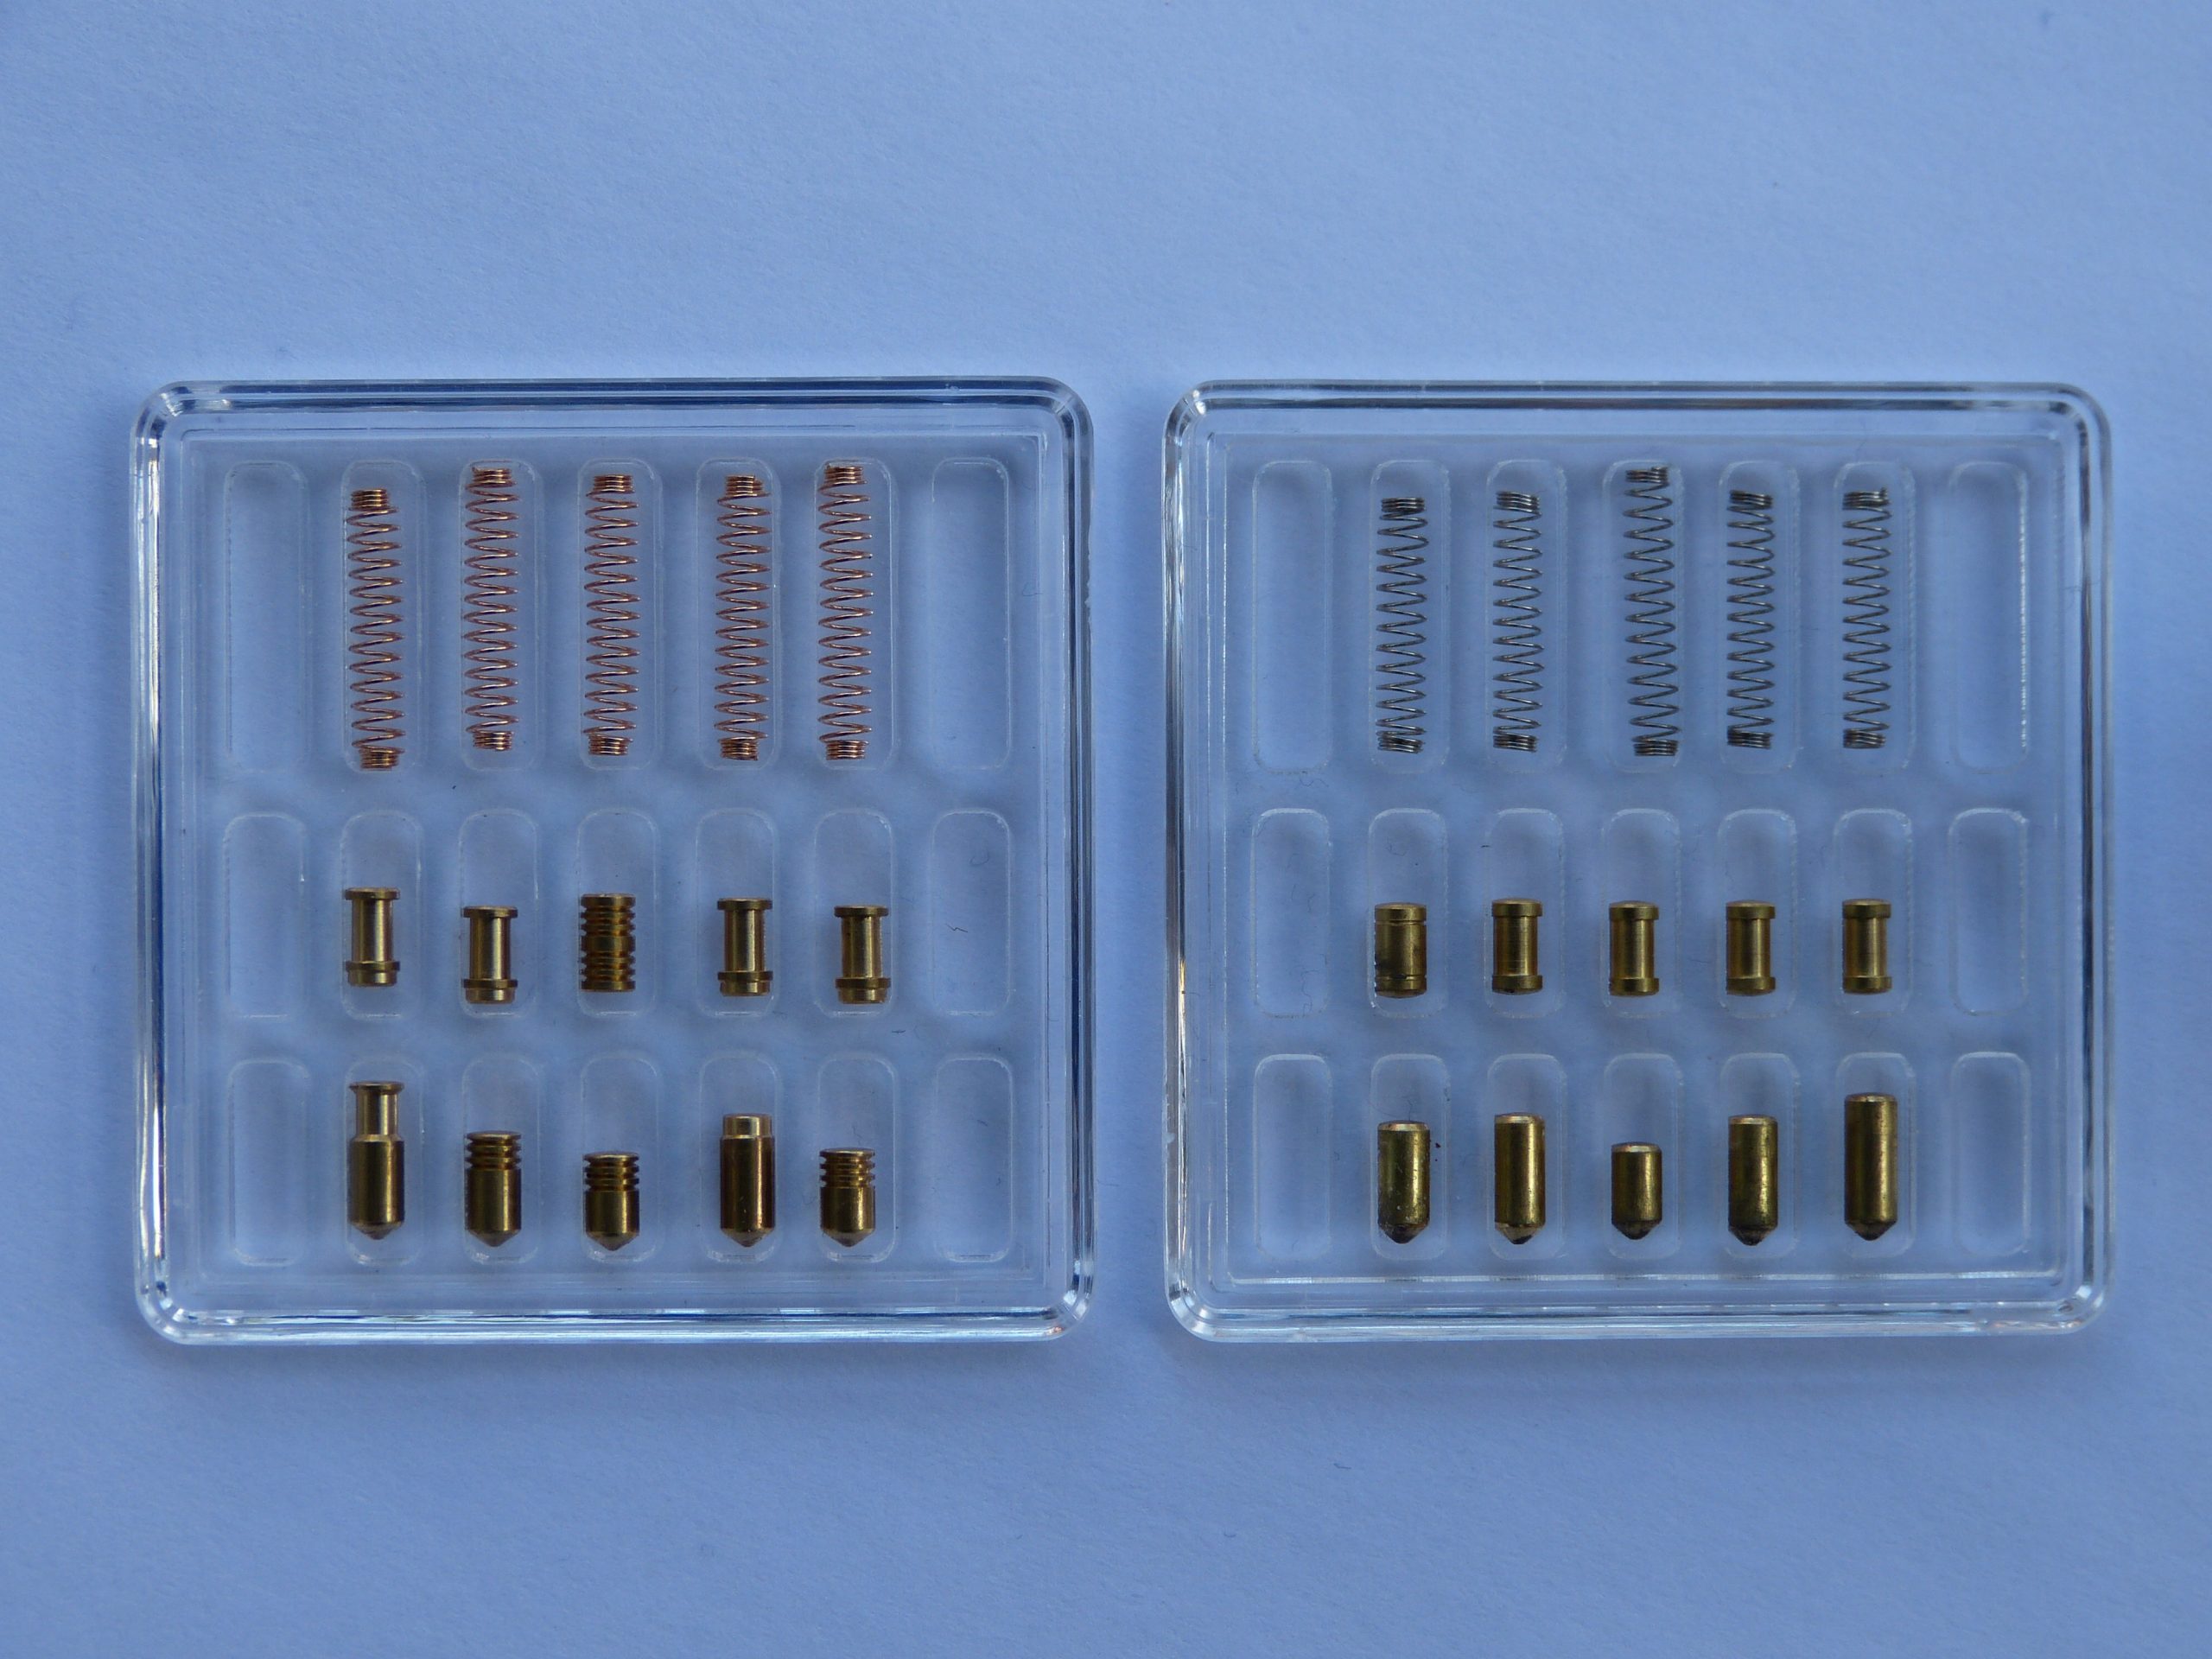
I’m considering this 30% an upper bound, as Abus C83 and CISA aren’t shipped with standard pins. The old locks are shipped with mostly spool pins, and the new ones have serrated, spool, and T-pin key pins and the same for the drivers.
Abus C83 old style vs new style pins.
Besides the theoretical usability and security pins, what other flaws would make this tool suboptimal? The picking tip snags while moving from pin to pin. Furthermore, picking in the counterclockwise direction binds the picking tip, and it makes it difficult to differentiate between a binding pin and a binding picking tip.
Randomly pinned lock with standard pins, decoded to 52452.
Let’s wrap it up, this tool is sold at €50 and promises quite a lot. However, theoretical, it will only open 30% of all the locks it was designed for. Furthermore, the limitations of security pins and rotation direction will limit the functionality even more. A practiced lockpicker might be-able to overcome some limitations, or detect the tool will not work. A tool that only opens a very small subset of locks is not a very useful tool, and I can’t recommend it to pick these locks. However, as new pickers always struggle to find the binders, and this tool enables them to actually ‘see’ what they are doing, it could be a game changer for teaching.
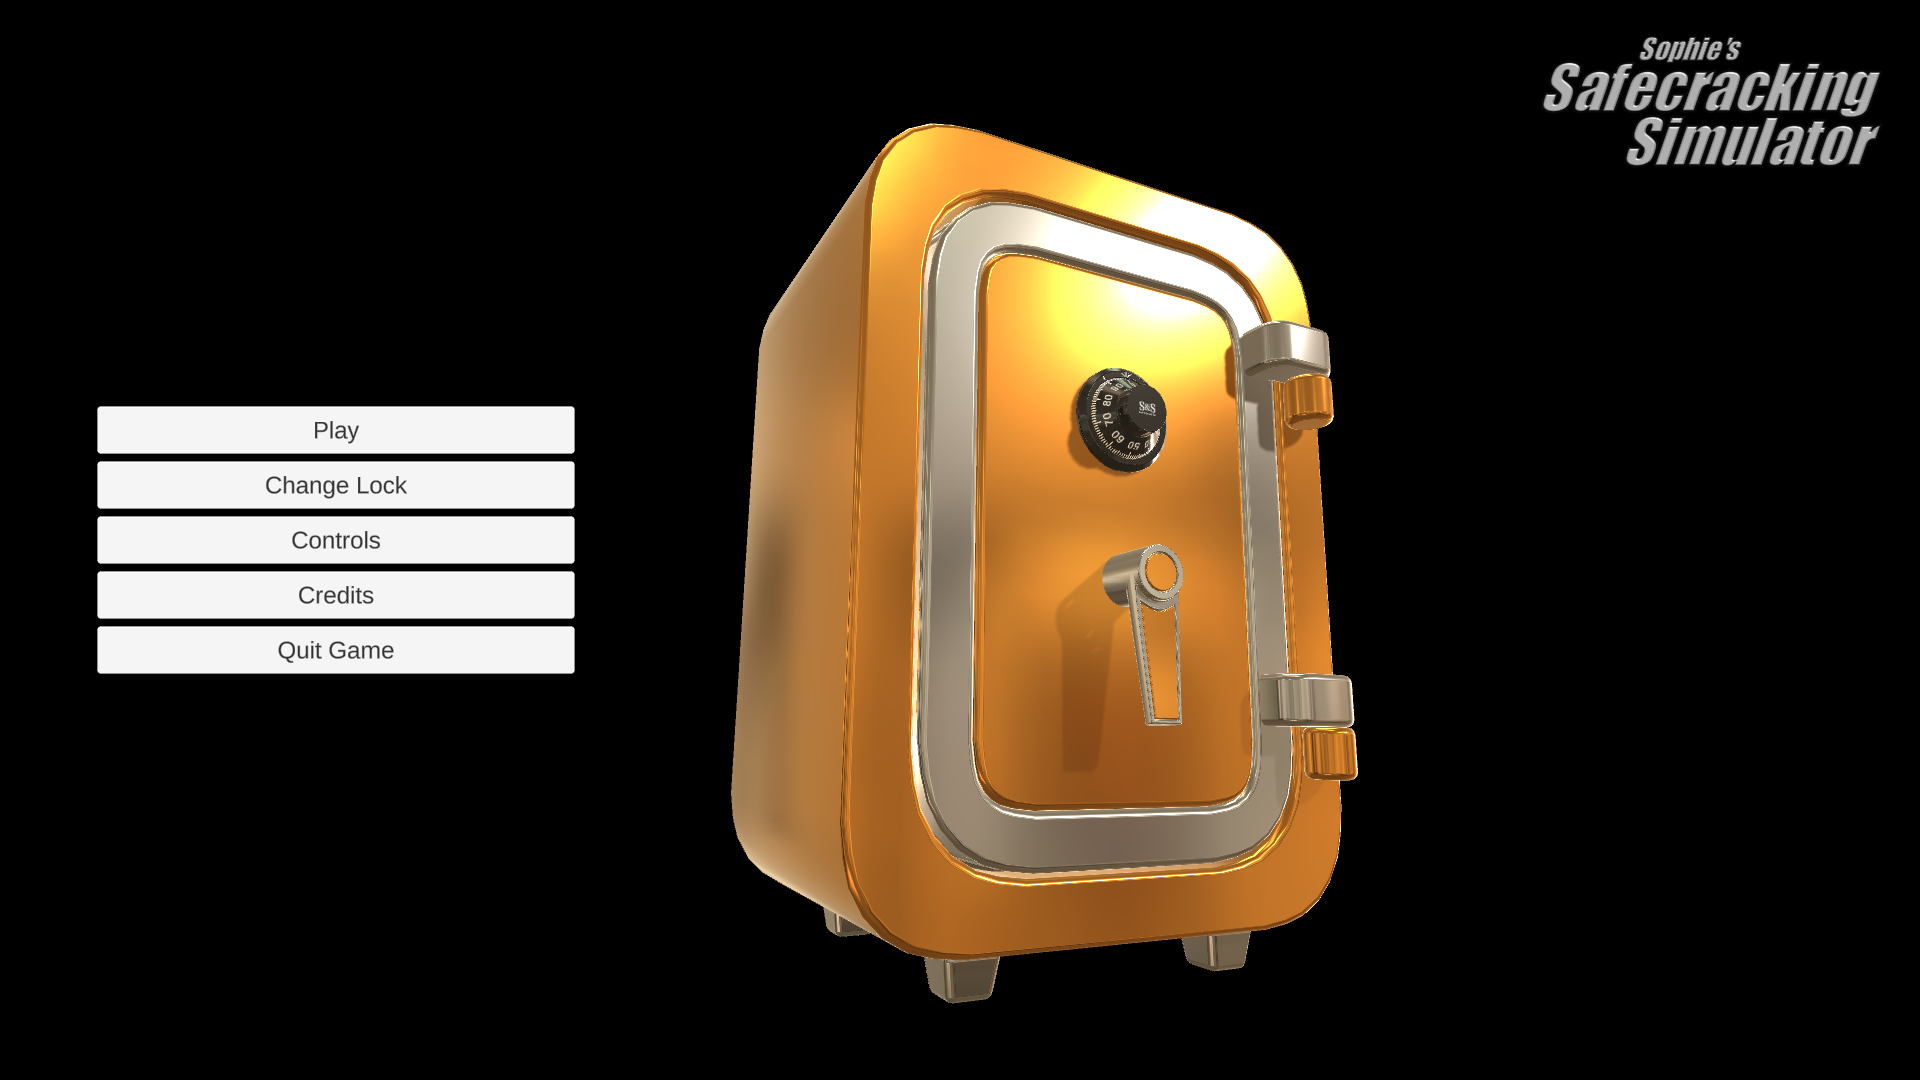
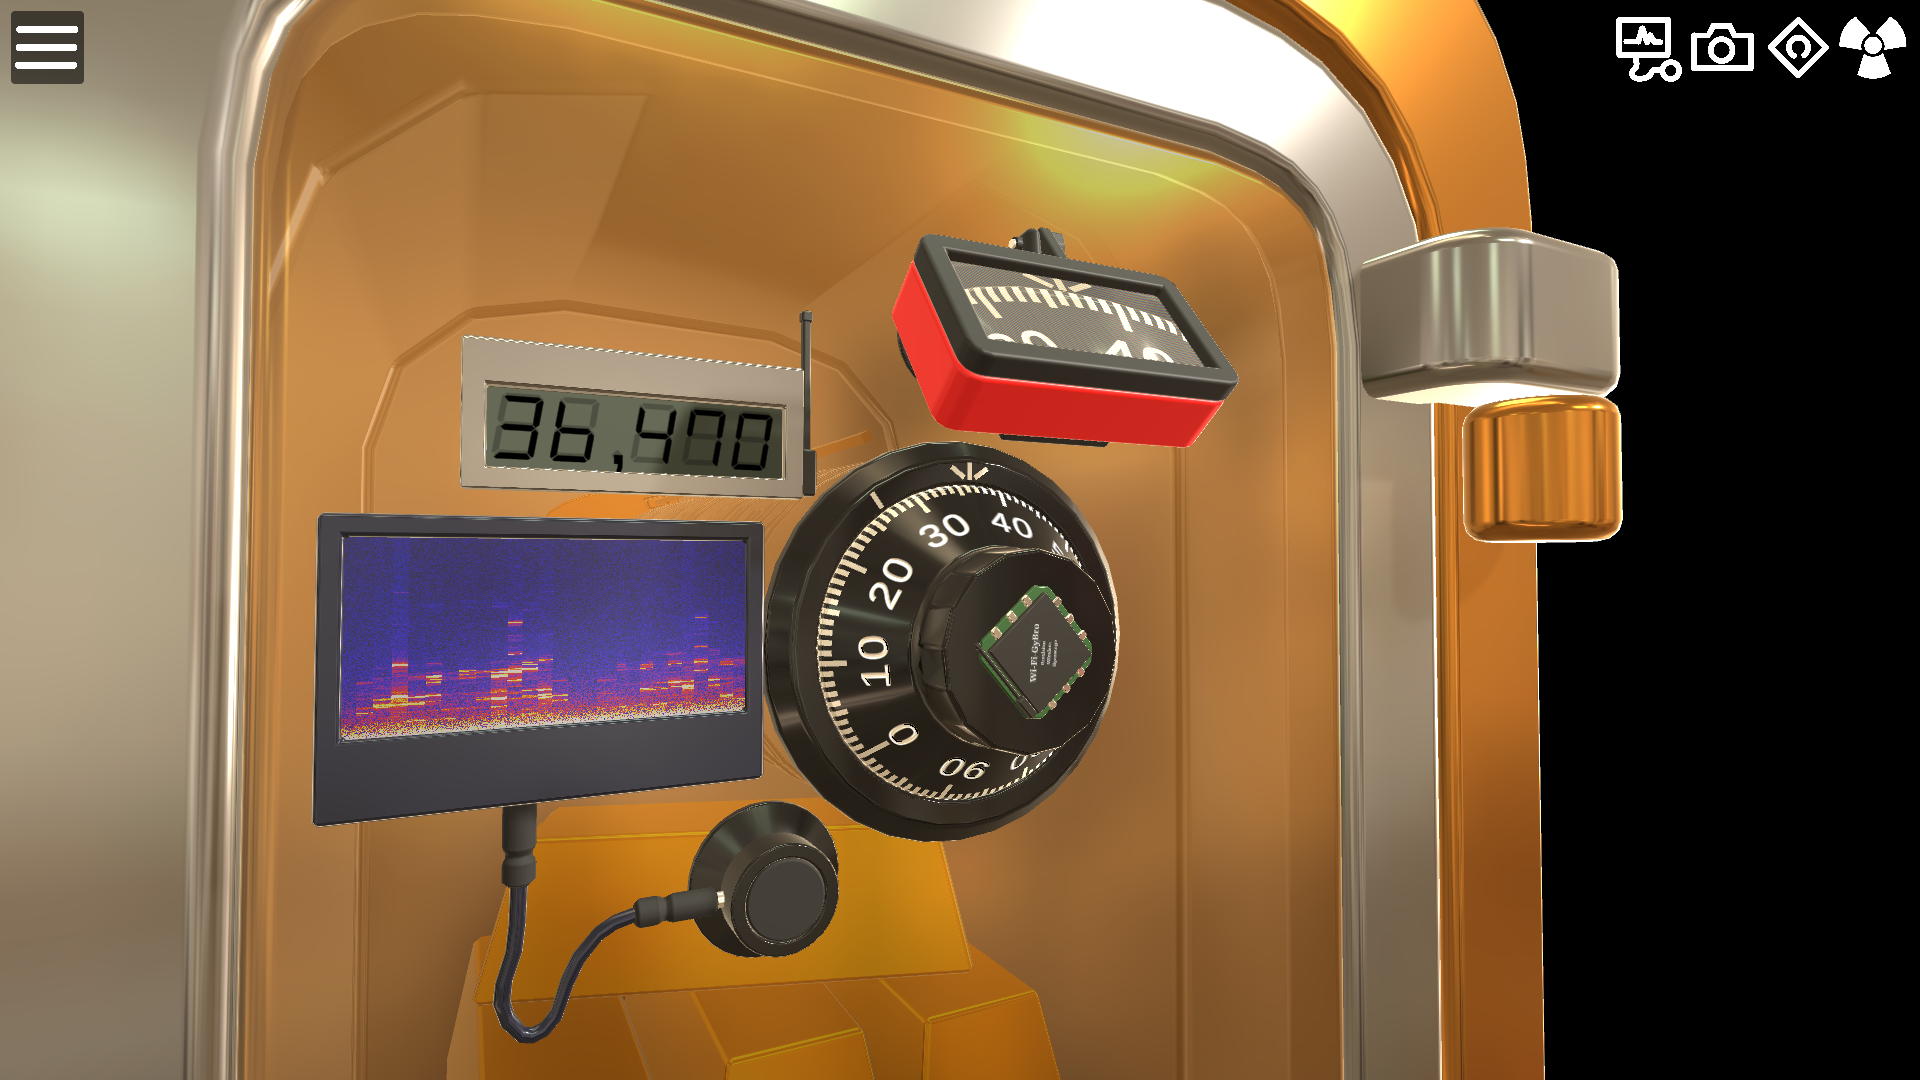
A few weeks ago on twitter I read a tweet by Sophie and they were working on a safecracking simulator. I was intrigued and joined the conversation. Both to comment (and compliment) on the progress and add ideas for even more realism!
So what’s the game? They designed a safe lock simulator and the game is to crack the safe! The lock from the fictional brand Safe and Sound (S&S). It acts as an average group 2 safe lock with three wheels (4xCCW, 3xCW, 2x CCW, and 1x CW). You input the combination with your arrow keys: Left and right arrow for moving the dial and control/shift to control the dialing speed. The simulated lock works just as you might expect, you can feel and hear the contact points and you can manipulate and graph it just like any other group 2 safe lock.
Cracking a safe
I’ve bought the game as soon as it was available and spend a couple hours cracking my first virtual safe.
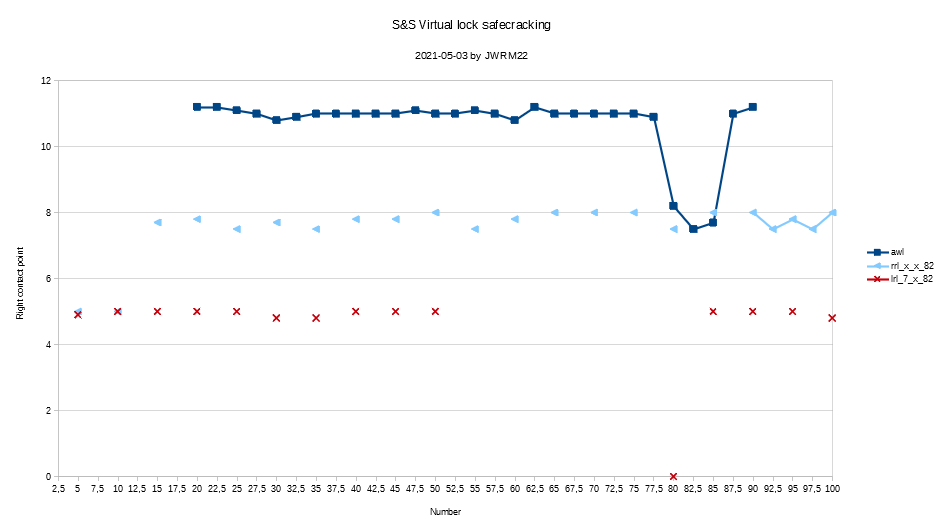
Cracked the safe with manipulation. The transparancy is on for the screenshot.Safe manipulation graph.
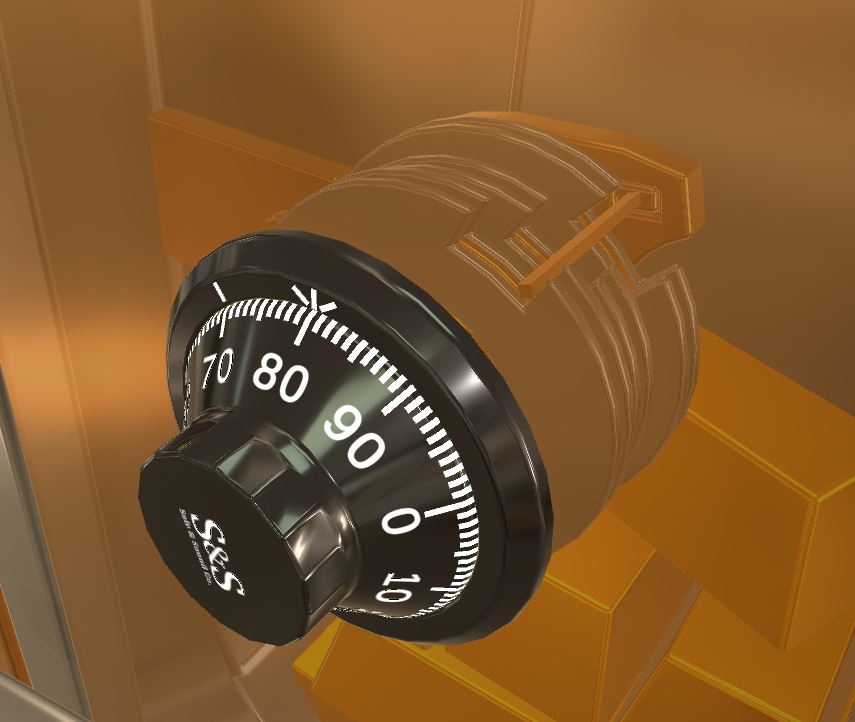
I like to start with getting a rough idea for the lock and do this by dialing all wheels left (AWL) with 20 number increments. I noticed the wheels are almost perfectly round requiring a full AWL graph and find one number at the time. I graphed AWL with 2,5 count increments and found the gate between 80 and 85. I set the number to 82 and tested the wheels. I found the number was on wheel three.
Then graphed W1 and W2 left and parked the W3 to 82 and graphed it with 5 count increment. Wheel one was at about 7. Figuring out what wheel it is was actually tricky as the simulated safe does not have flies and this means LRL is not the same as RLR for this lock. This also means you can find a number that’s impossible to dial without some calculating.
Lastly I graphed the last number 7-X-82 and found the combo 7-78-82. The dial stopped at 80 indicating I opened the lock. In the version I played it wasn’t possible to open the safe. I claimed being the first one to open the virtual safe on twitter shortly thereafter.
What else can the simulator so?
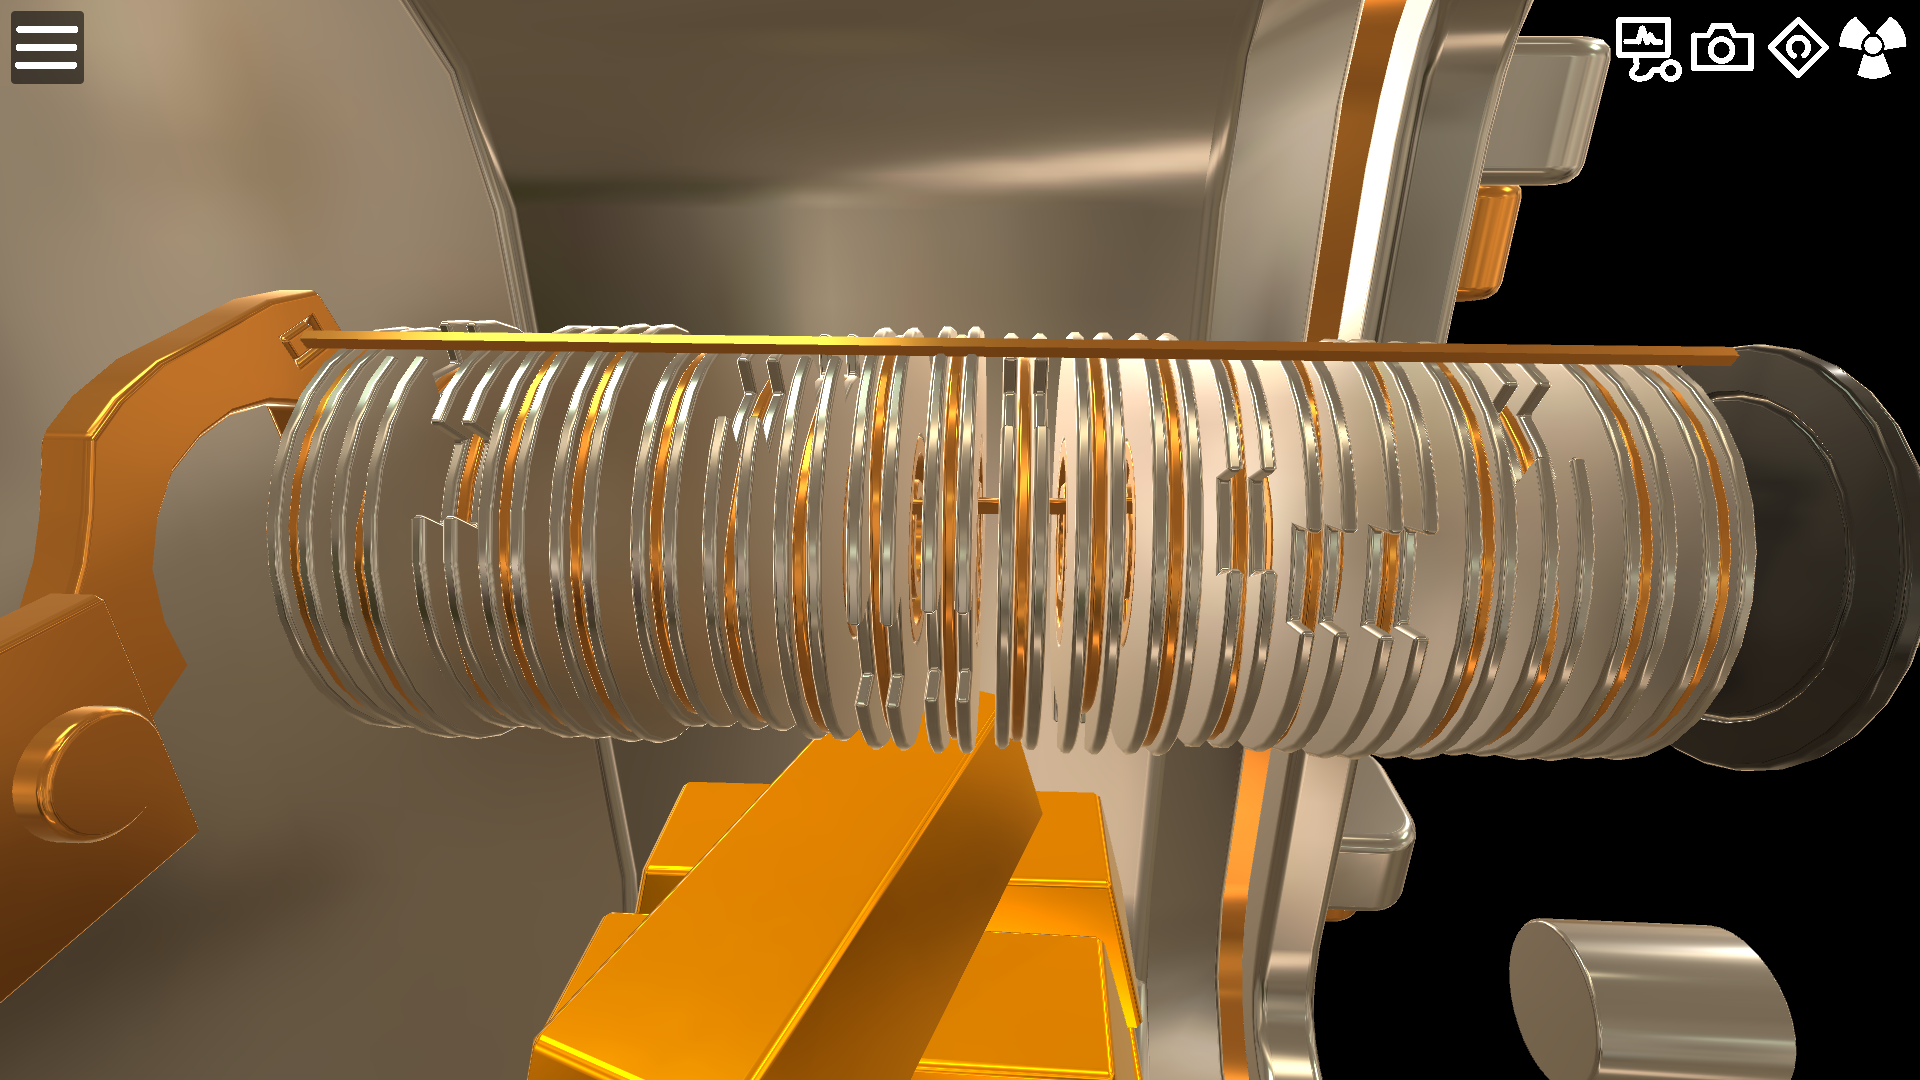
Once you have mastered the three wheel, why not try a twenty wheel lock? This lock will take 21 times right, 20 times left, 19 times… Or was it 21 times left, 20 times right. at what number was I again? In total it would take 231 moves to just open it with the combination. I can’t imagine how fun it would be to graph this one!
Not all hope is lost as the safecracker gets a handful of tools to simplify the process: Gyroscope angular measurement, camera to amplify vision, sound spectrum analyzer, and X-ray vision. You can also use advanced keyboard shortcuts to spin the dial exactly one rotation, simplifying the safecracking process.
Suggestions to Sophie
The project is very cool and certainly a functional game. These are a few suggestions for added realism:
I feel the current shape of the wheels is too perfectly round. Real life safe wheels are sometimes oval or egg shaped. They sometimes have an offset from the wheel center as well. This feature is only beneficial when the wheels are closer matched in size. Currently it’s very hard to find what wheel is the largest and thus the one you want to isolate.
As far as tolerances I think the game does very well. Yes, you can make it more tight but then you can easily make the safe impossible to manipulate. It’ll not be bad to have a setting you can play with to make the lock a lot harder.
Currently the safe does not have flies. It’s hard to explain what it is or how it works; It’s a small movable element that ensures you can dial two numbers on consecutive wheels to the same number. If it’s worth the effort for this extra realism, I won’t know.
Lastly there are a lot of ways you can go to with this project. As a simulator it works but it would be very cool to have a ‘spot the fault’ puzzle game. I.E. The combination is 10-20-30 and it only opens sometimes. Then the player could learn about failure modes like when fly is stuck or the wheel slipped. You can use the trouble shooting guide for a S&G as inspiration. In the PDF it starts at page 9.
Conclusion
The game is very much what I expected from it and it captures the nuances very well. I will certainly recommend it to people that are looking into safecracking. I will use the the simulator as training material as well. (Every participant buys their own copy.) I think it can be a very useful teaching tool.
I don’t think I would play much with the simulator myself, mostly as I have played with and have access to the real locks. The game captures the tediousness of safecracking very well and that’s amazingly impressive 🙂
Jos has a talk about key duplication from pictures. If you have not seen it: https://youtu.be/muINcnhj1EQ For a conference there was the question: What does it take to make it into a workshop? There was little budget so we have turned it into a CTF instead of a training/workshop. This CTF has no prices and might teach you something new.
If you ever wished you could try it without being sneaky, this is your chance. The CTF is a controlled and safe environment. You are encouraged to copy these keys!
The problem: Publishing pictures of your keys is not a good security practice. Keys can be duplicated from a photo rather easily. Twitter and other social media are full of threads filled with pictures of keys. I got shared one but they’ve removed it on our advice. (Note to self: Take more screenshots.)
The CTF: 1) Get to the keys 2) Take a photo or make an imprint of it 3) Make a key 4) Test the key
Measuring tools and files will be available at the lockpicking village. We are going to help as little as possible to not spoil the fun.
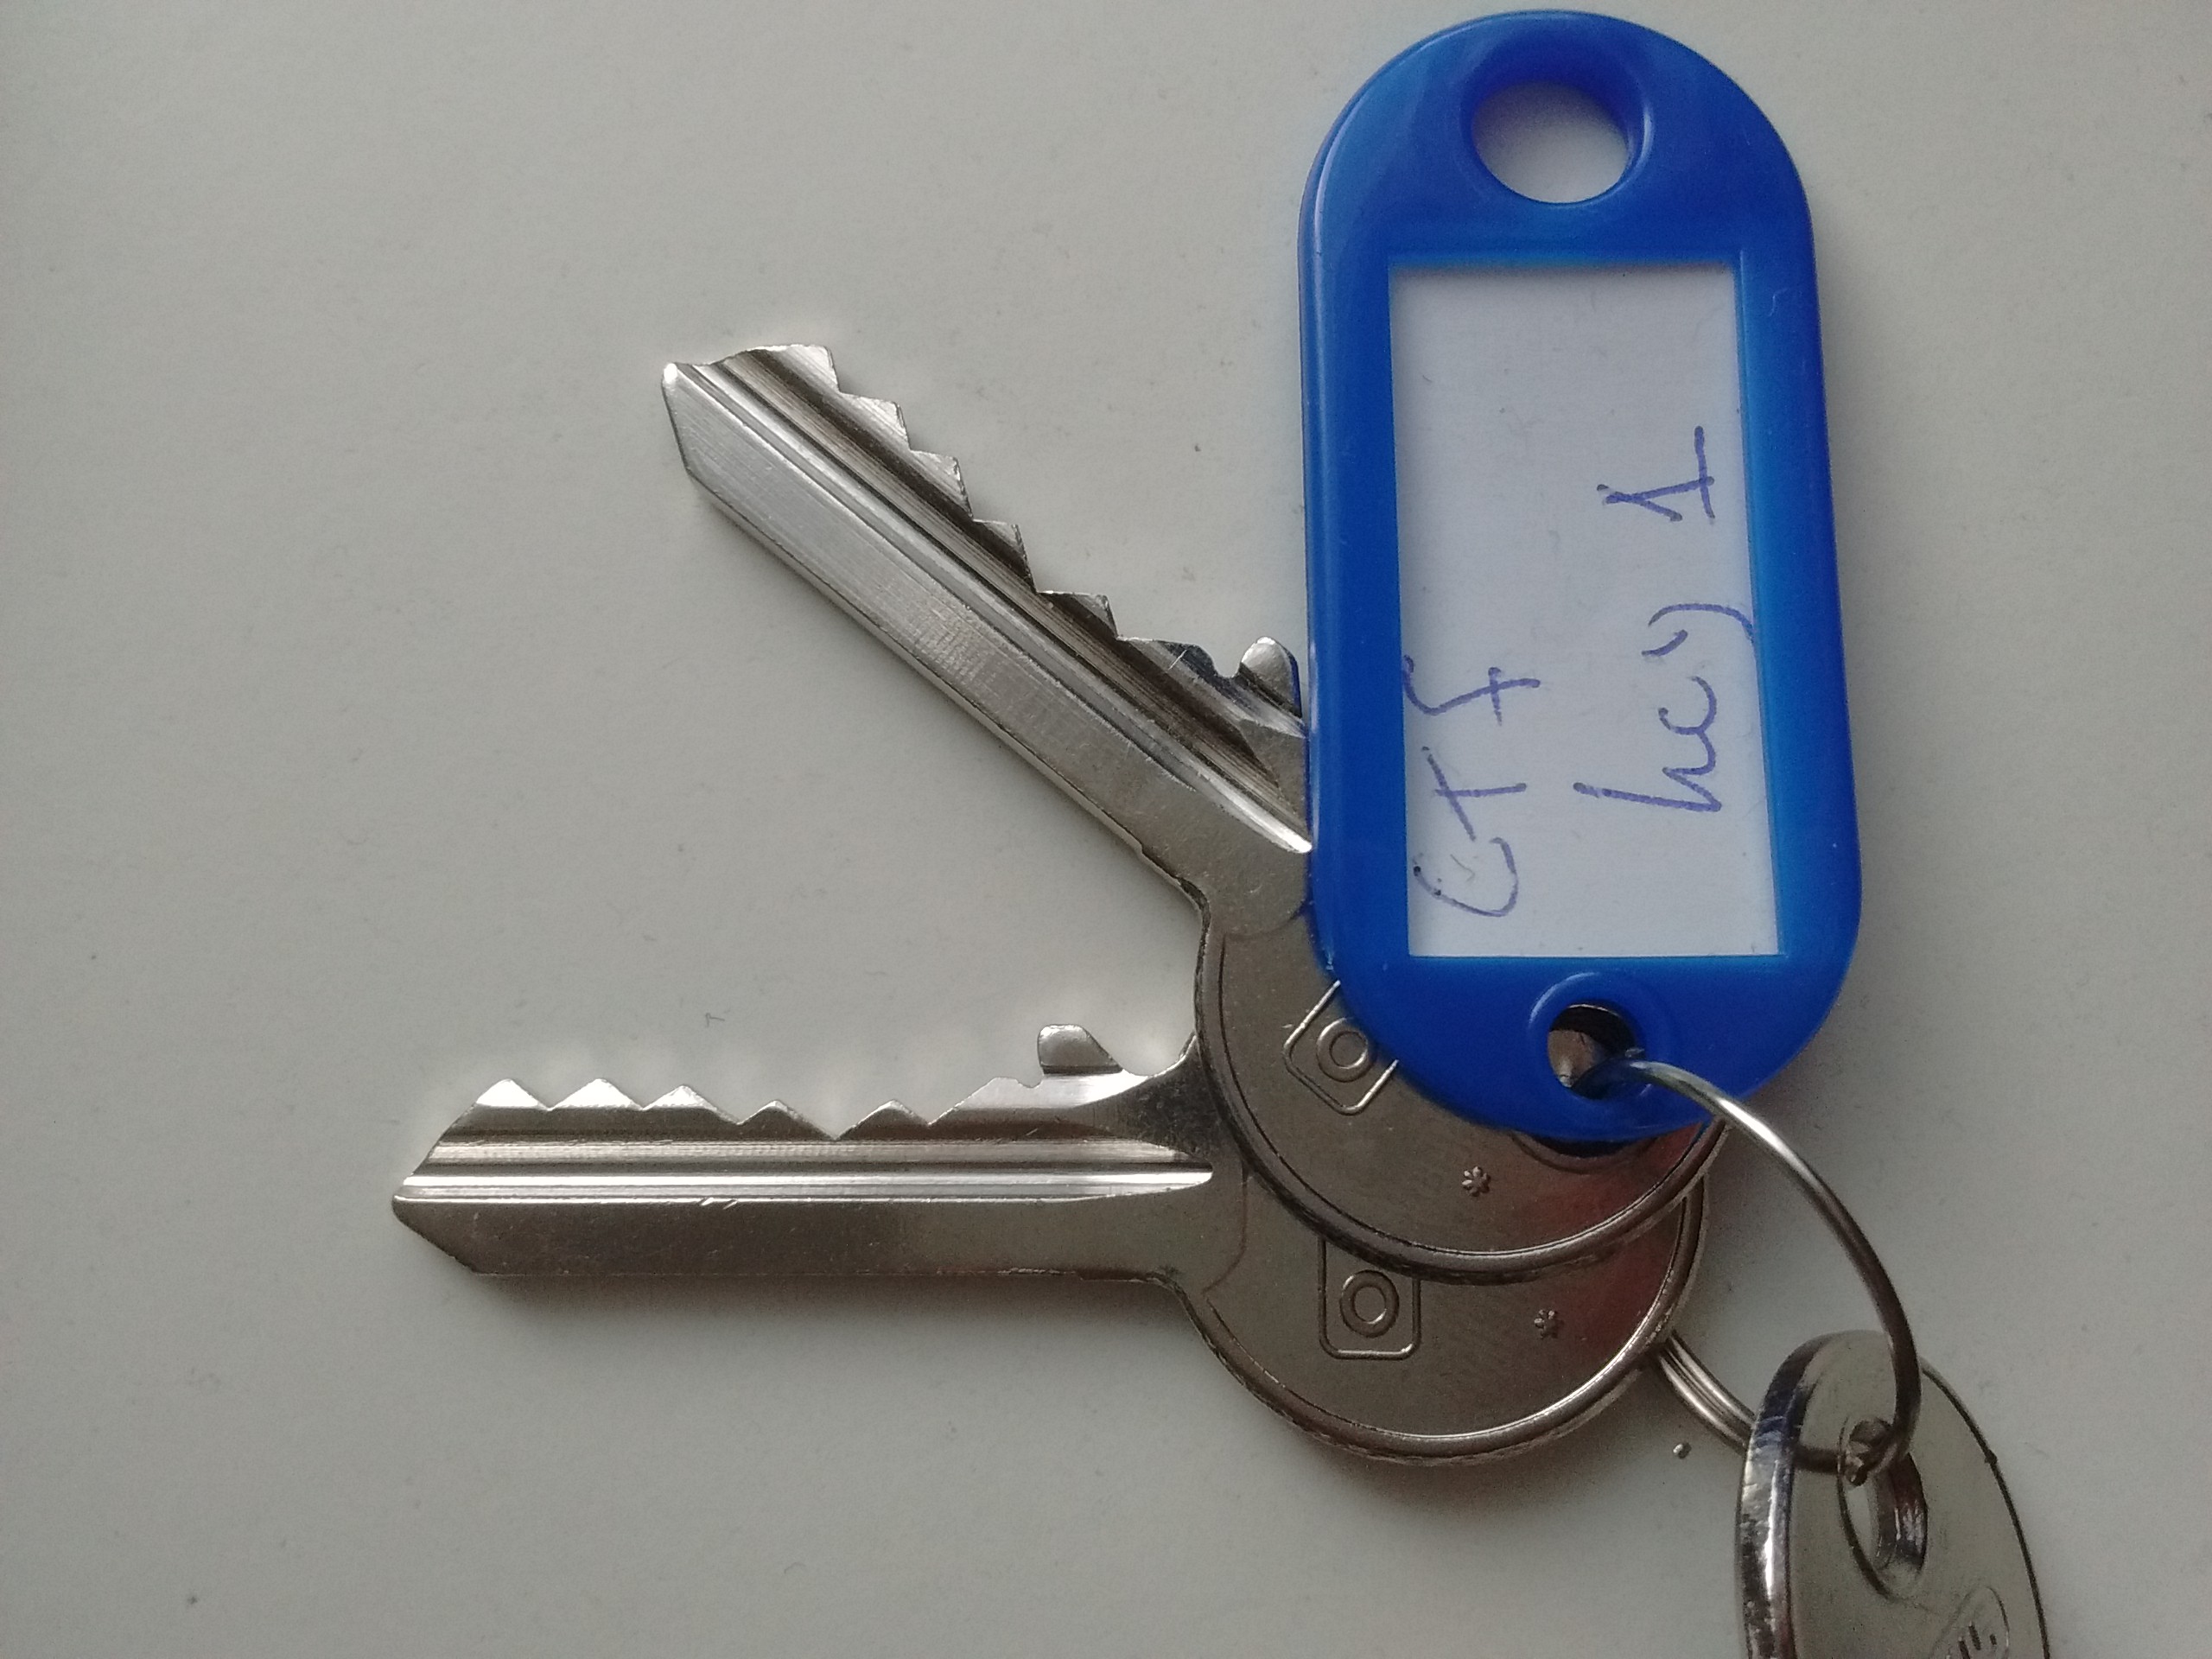
There are three keys at the moment: CTF 1) Key will be published here CTF 2) Key will be placed on the table at lockpicking villages (do not borrow/steal the key please.) CTF 3) Key will be on the belt/lanyard of the Orga or instructors at the lockpicking Village
Please don’t publish pictures of the CTF 2 and CTF 3 key. You are allowed to do a writeup about CTF 1.
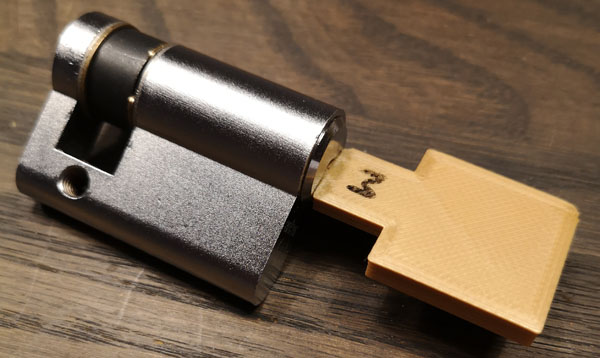
CTF Key 1:
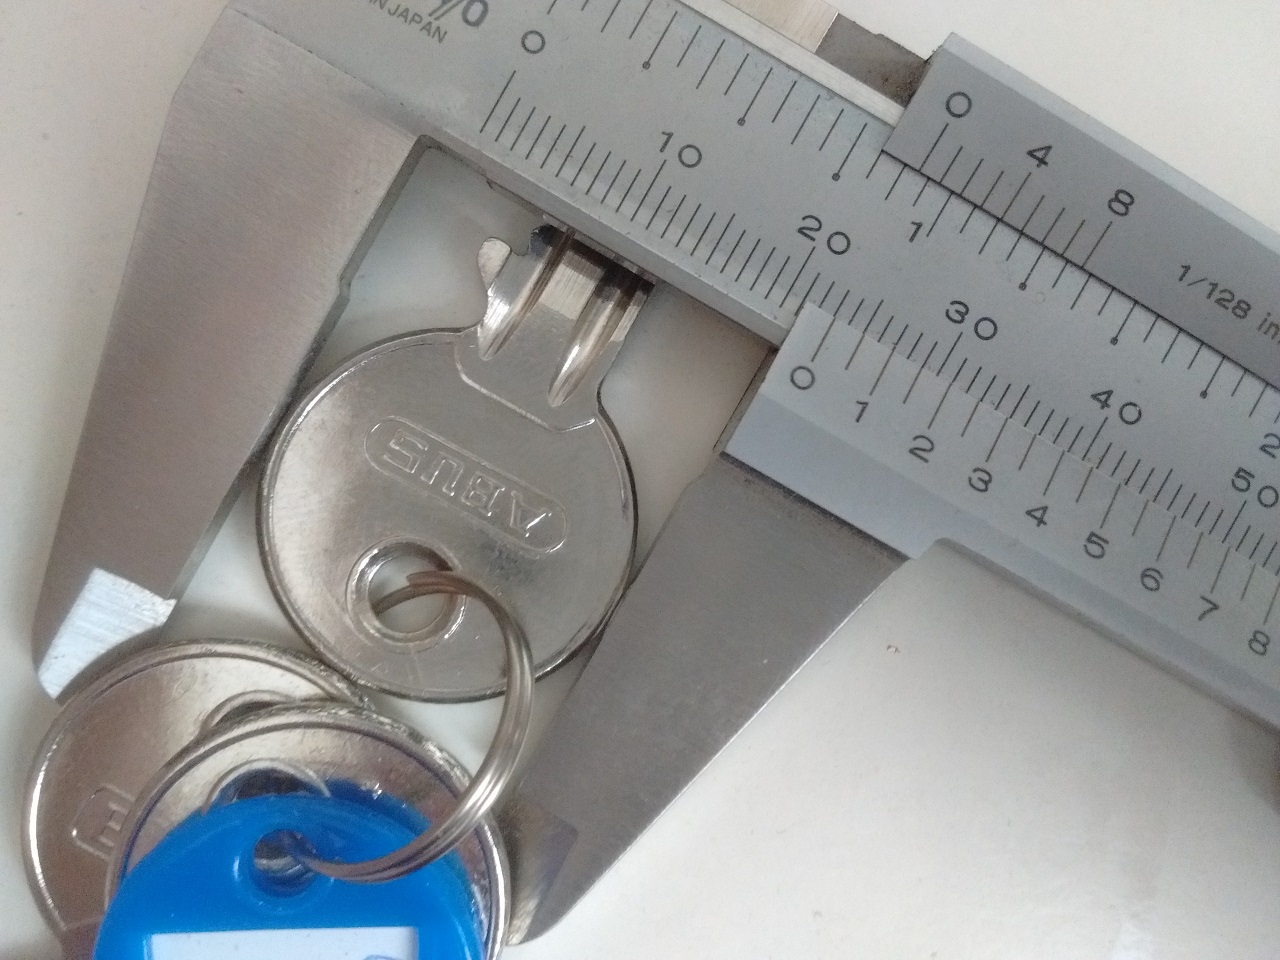
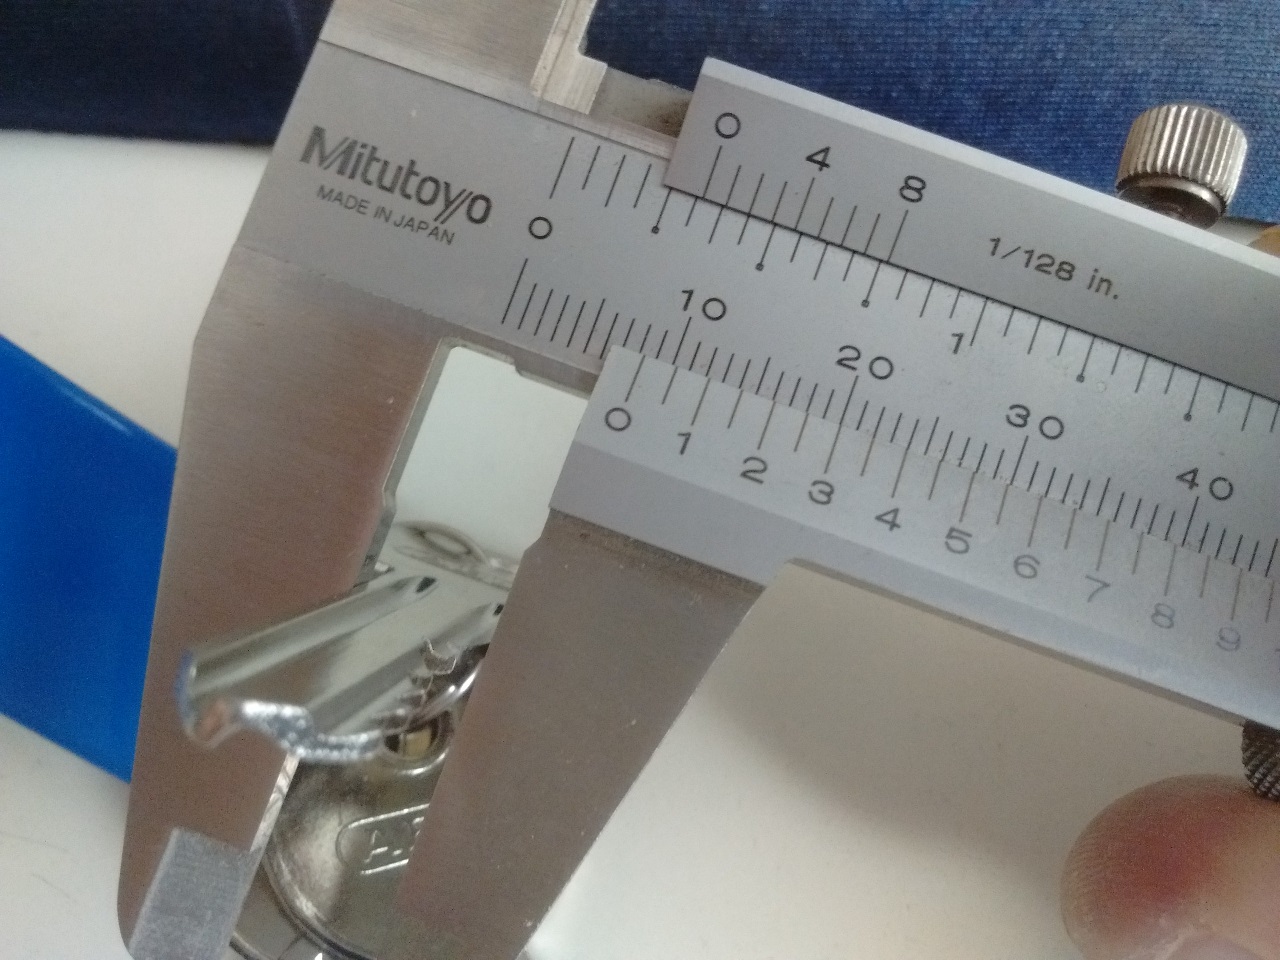
Key measurements:
As there was still some ambiguity, this picture should prove be useful. Each square is 5mm by 5mm.
All locks are standard unmodified 5pin Abus/Buffo. The blanks that work are Y1, 1A (SKS/JMA), CS206 (Silca) and many others. You’ll get points for sourcing your own keys. Really, give it a try!
This CTF will run for the next months to years. Come see Toool at a conference near you. Next up: Hardwear.io, HITB, LockCon and Hackerhotel 2020.
If you want to play but can’t make it to a conference. Please send me a digital bird at Jan-Willem at Toool dt nl. You’ll be send three pictures and a post address. You can mail me the physical keys you’ve made.
I’ve tested the CTF myself. It took me about 30 minutes to make three keys from a photo. Please, don’t publish pictures of your keys, stay safe.
The company Lishi is mostly known for their decoding tools for several brands of cars. Now, they also have decoding tools for Schlage and Kwikset locks, that works similarly.
Although not as much a sport as lockpicking using standard picking tools, we are always eager at Toool to try out new tools. Not long ago, Jan-Willem already tweeted about the tool:
Now, we also have a demonstration of the Schlage tool, done by Jos:
Enjoy!
Walter.
Posted in Decoding | Comments Off on Lishi Schlage impressioning tool
I regularly give lectures and workshops about locks and lock related topics at conferences such as CONFidence, Hack.lu, BruCON, 4GH, SEC-T, Hackito Ergo Sum, Hashdays, Fri3dcamp, TEDx and more. My latest talk was also the most interesting. It was at the wonderful t2.fi conference in Helsinki, Finland.
I was there in 2014 as well. This year, I could only speak again if I’d open Finnish locks. And Finnish locks are among the most secure.. Almost everybody in Finland has ASSA Abloy locks on their door. Many Fins believe these are unpickable. So I set myself the task to open these locks.
First, I tried the H&H tool for opening Abloy. I then found out this tool does not work and simply cannot work, unless you can set the discs in order. So this was money wasted. I finally was able to purchase a tool from Citadel LockTools in the UK, that can actually open (and decode) Abloy Classic locks. These tools are handmade by Matt and look and work fantastic.
The tool comes with several tips, for different kinds of locks. I bought a few Abloy Classic ‘handbag’ padlocks and it’s interesting to see that they differ. In one, the deepest disc is locked, not so in the other. They both need a different tip on the tool.
Using this tool, I was able to open an Abloy Classic live on stage in Helsinki, which got me a nice applause!
Here’s a clip of when, after some practicing, I was first able to open the Classic using Matt’s tool:
Not many people have experience in opening pump locks (locks using a push key). However, one of the guests at LockCon 2014 has ample experience. And: he has built his own tool to open these locks. This is what it looks like:
At LockCon, you will be able to see the tool in action with live commentary from the maker. You can see a 17-second sneak preview from the ELF conference here:
Posted in LockCon, Decoding | Comments Off on LockCon 2014 addition


